
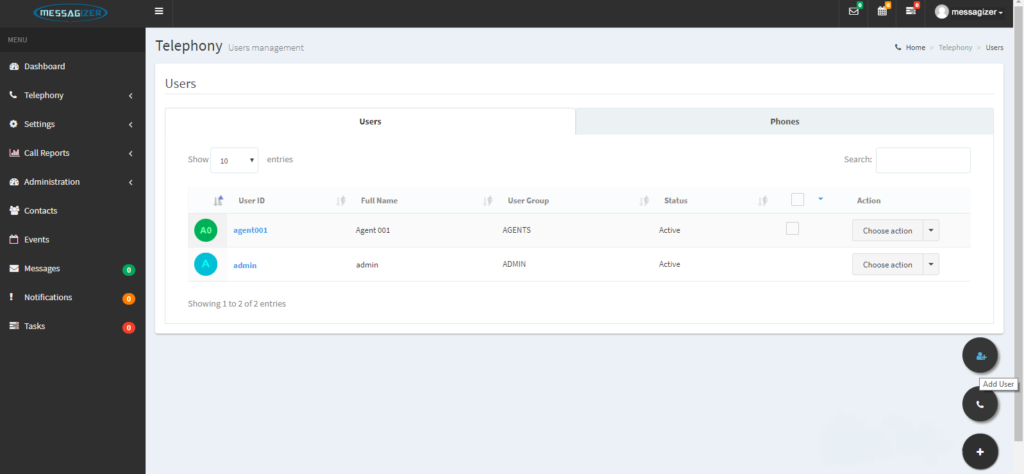
1. Login your admin account on the MENU click TELEPHONY > USERS
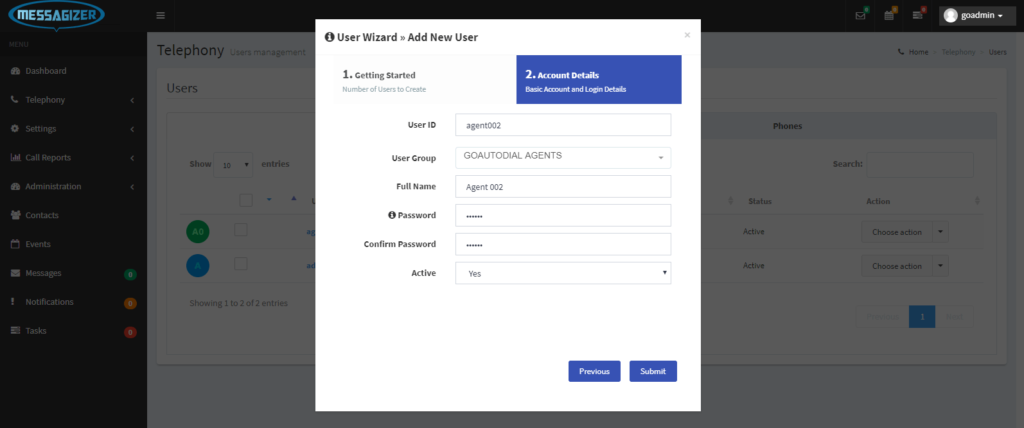
2. On the USER PAGE click the + button on the right side down corner to create.
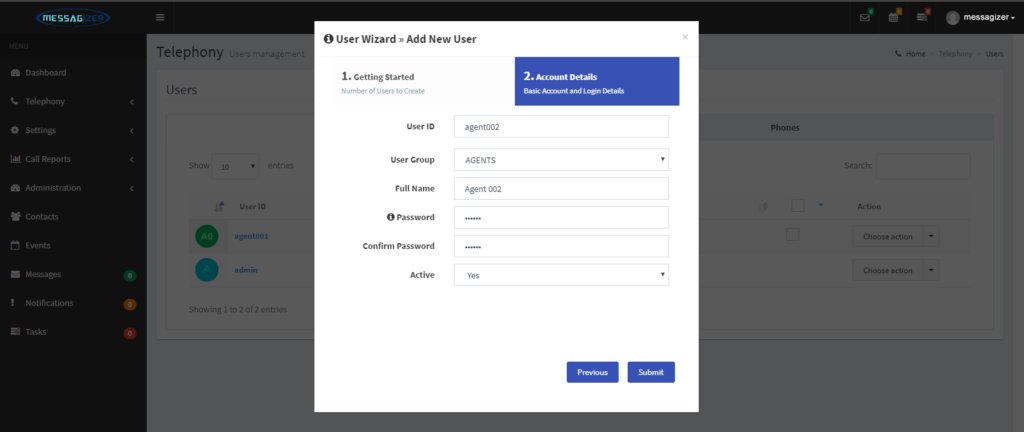
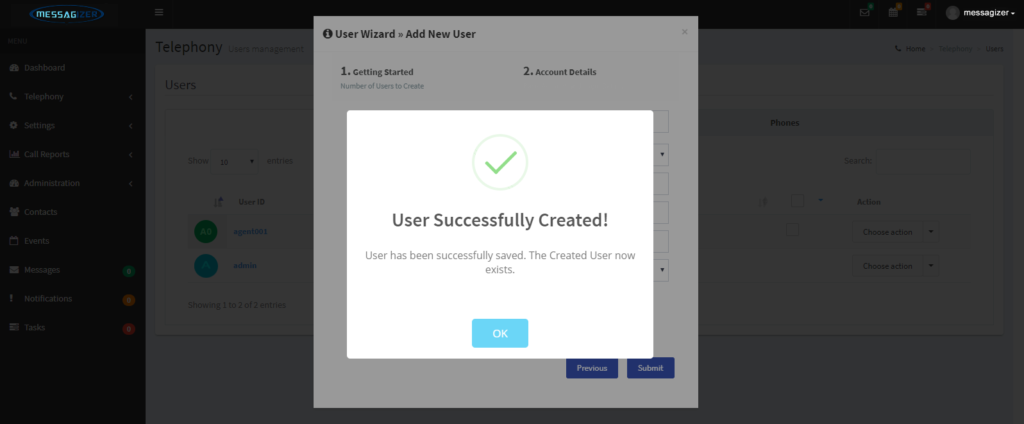
3. Fill up the wizard type set which User ID , PASSWORD and NAME that you’ve want to set then click submit once its done.
NOTE
• ALWAYS check the agents credentials on the admin portal
• You Must use only one User/Agent account per workstation.

2. Click on ADD NEW CAMPAIGN and select the CAMPAIGN TYPE (Outbound).
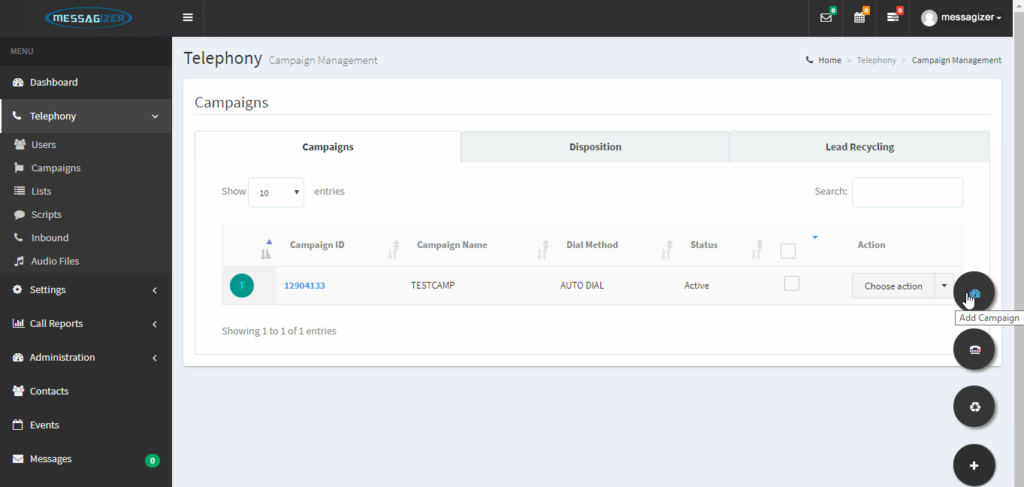
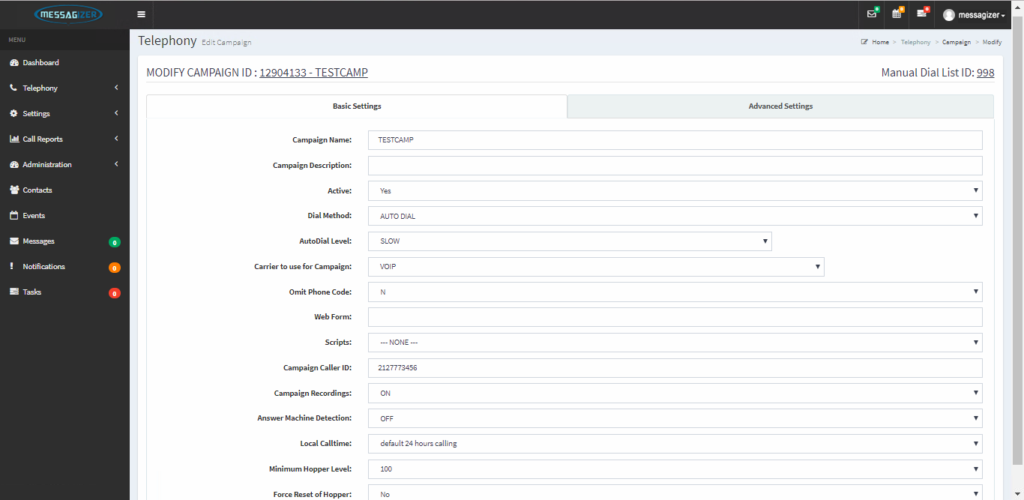
3. Click the Campaign ID to check the campaign settings. you can also select a preferred settings for your Campaign. For the Dial Method you can choose Manual, Auto_Dial or Predictive and for the Auto Dial Level you can choose Slow, Normal, Max or High. “Carrier to use for this Campaign” allows you to choose between Manually created carrier and an existing JustGoVoIP account for your campaign. Please note that only active carriers will appear/ will be shown. Click “Update” once done.
Change Omit Phone Code value to: Y (Yes)
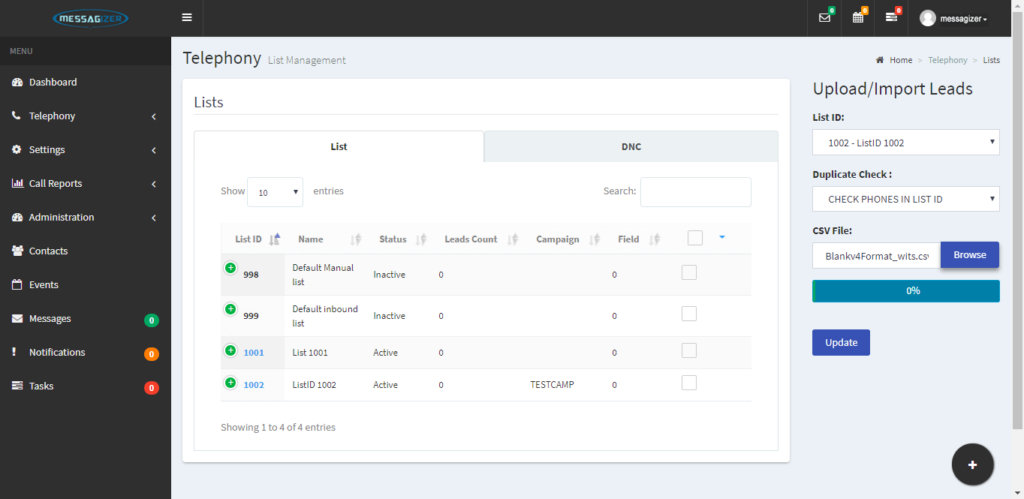
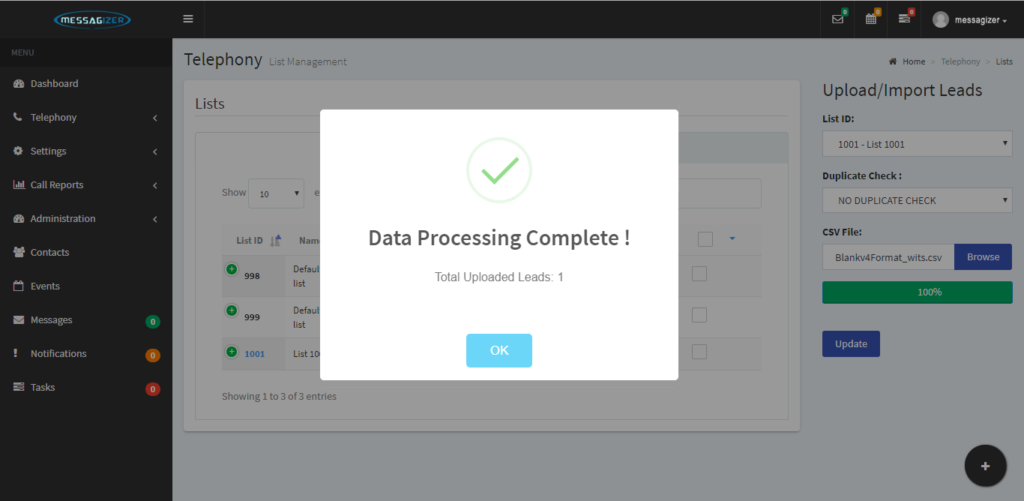
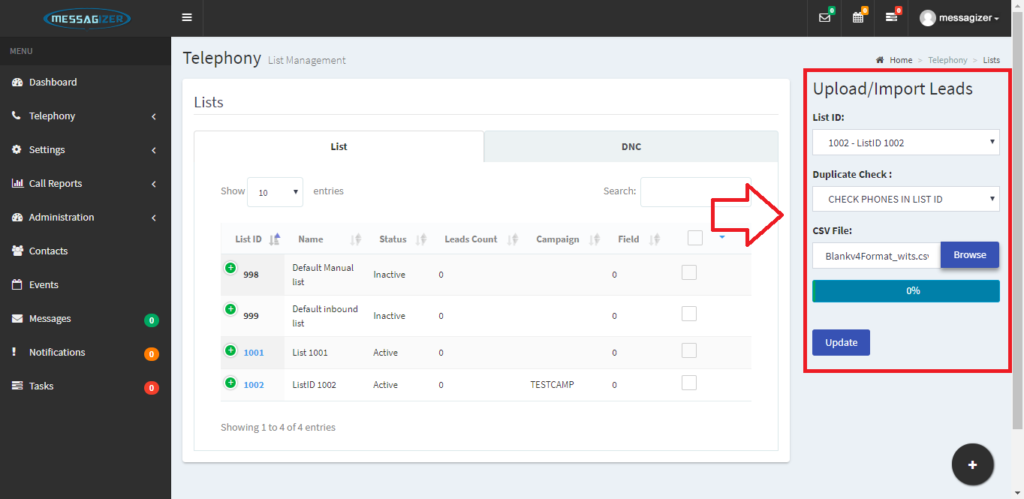
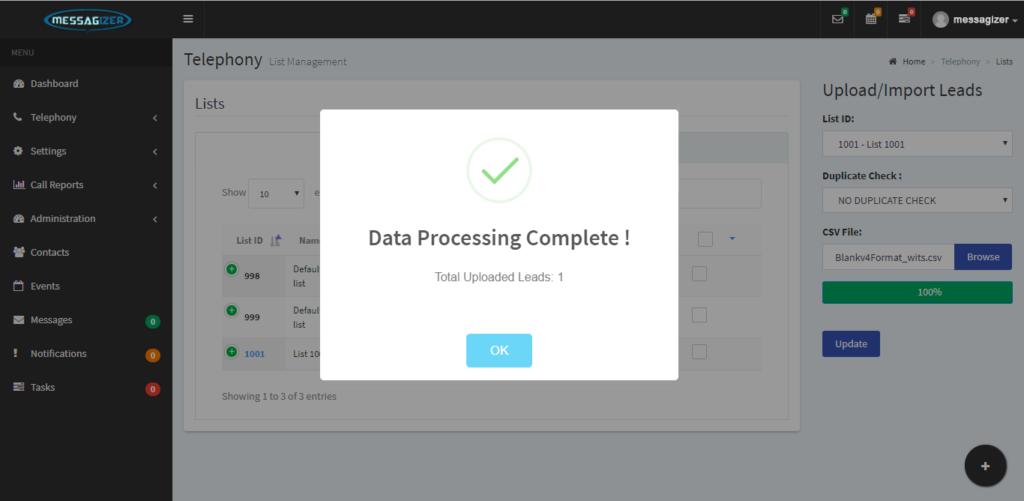
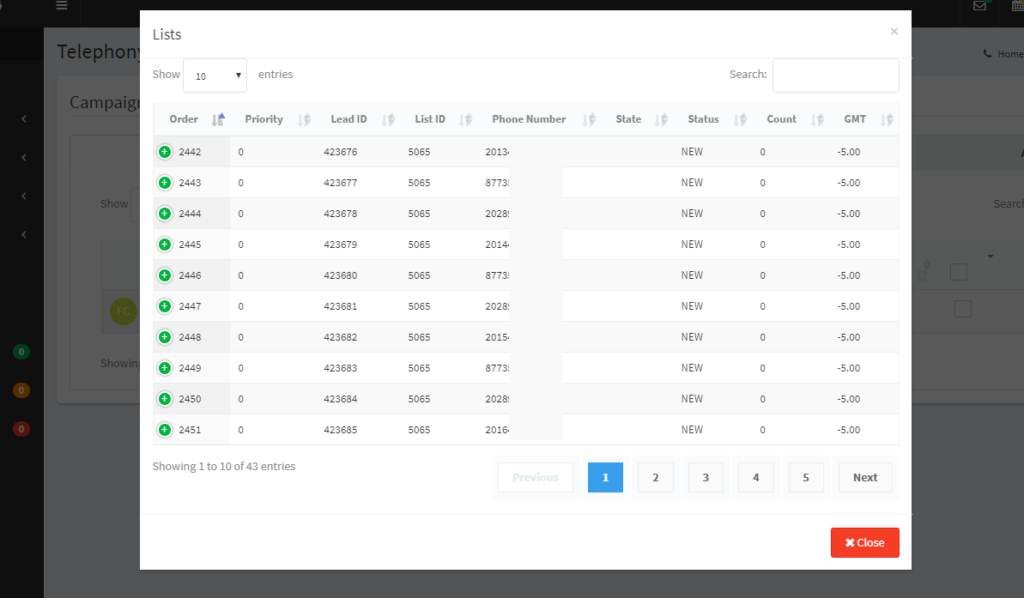
4. To upload your lead file. Click TELEPHONY and LIST. click the + sign button on the bottom right corner to create a new list id.
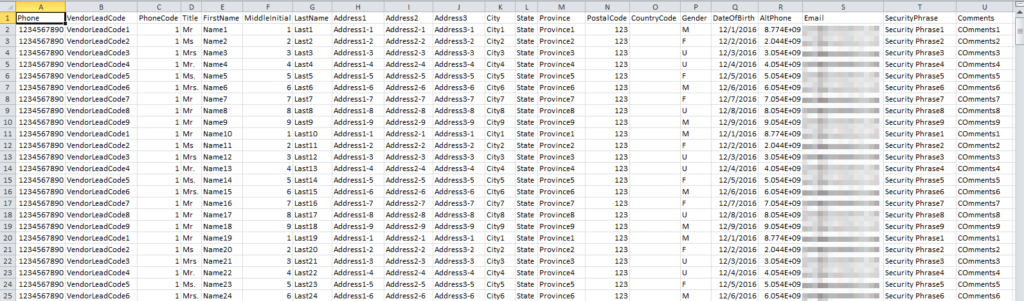
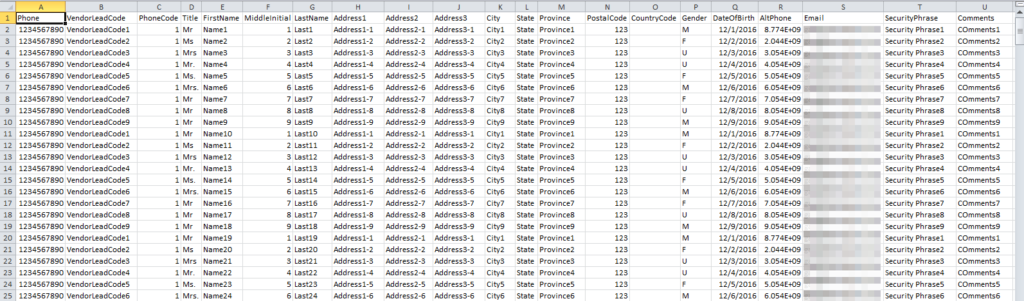
5. Make sure that you’ve followed the lead file format and save as .csv comma delimited.
6. Lead status will be posted after you successfully uploaded your lead file, Click Ok once its done.
7. Login to Agent Account to Launch Campaigns
NOTE: kindly create a new agent on the admin portal. Go to TELEPHONY and USERS click the + button on the lower right corner to create a new agent. after creating kindly disable agent001 and use the newly created agent.
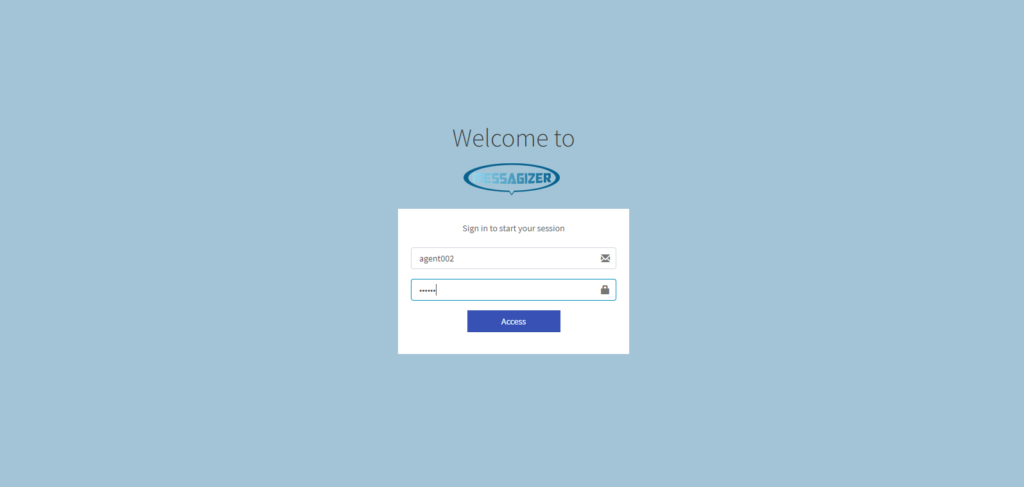
1. Once the new agent has been created open your portal via a browser by putting the IP address on the address bar. Input the agent credentials below then click ACCESS.
Agent Login: agent002
Agent Password: Go2018
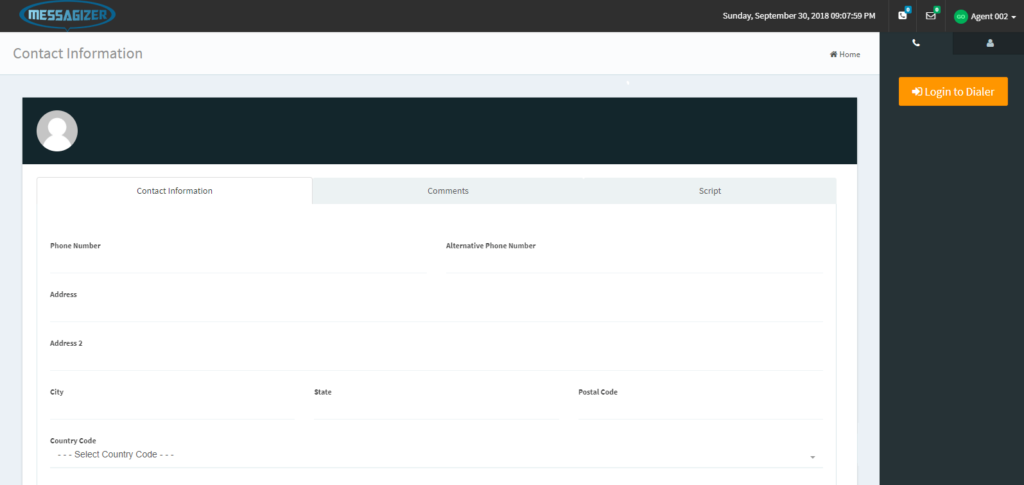
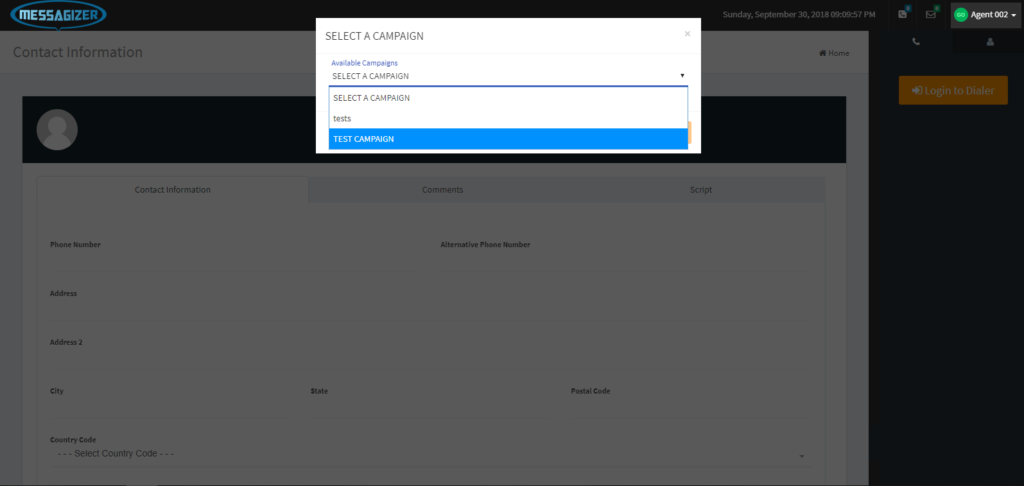
2. Select the “LOGIN TO DIALER” so you can select the Campaign then proceed your agent will heard a voice prompt “You are currently the only person in this conference” and on the left bottom corner there’s a notification “Your phone extension is now registered.” that means the agent is now login properly
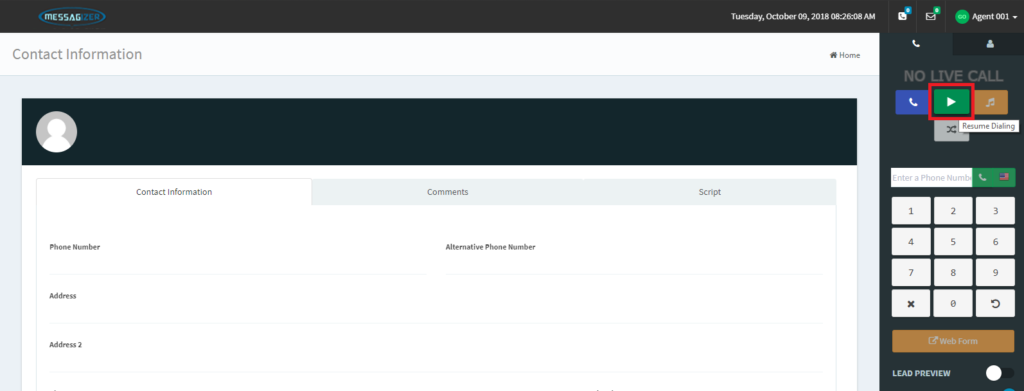
3. Click Resume Button to start receiving calls if your campaign is using a Predictive dialing or Auto Dial method of dialing. once the highlighted “LIVE CALL” will be the key/basis to know if the call was successfully connected.
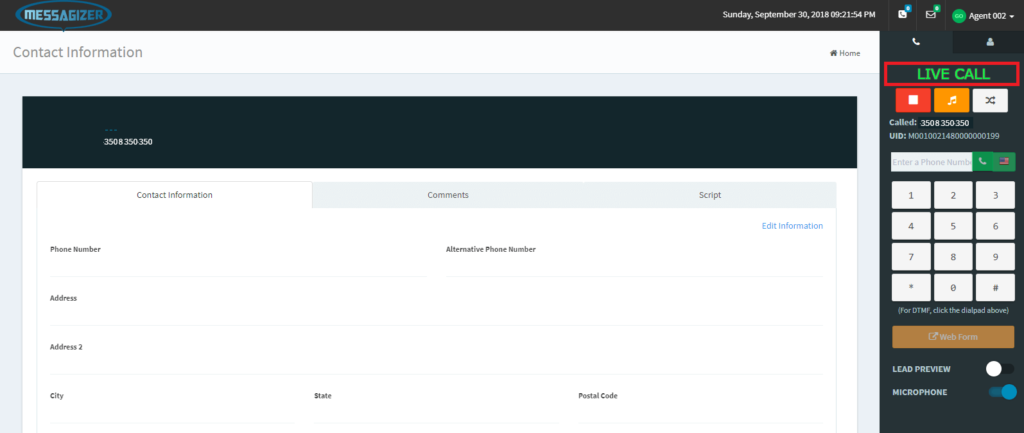
4. To do Manual Dial just type in the phone number on the manual dial box then click the flag of the country that you are planning to call. once the highlighted “LIVE CALL” will be the key/basis to know if the call was successfully connected.
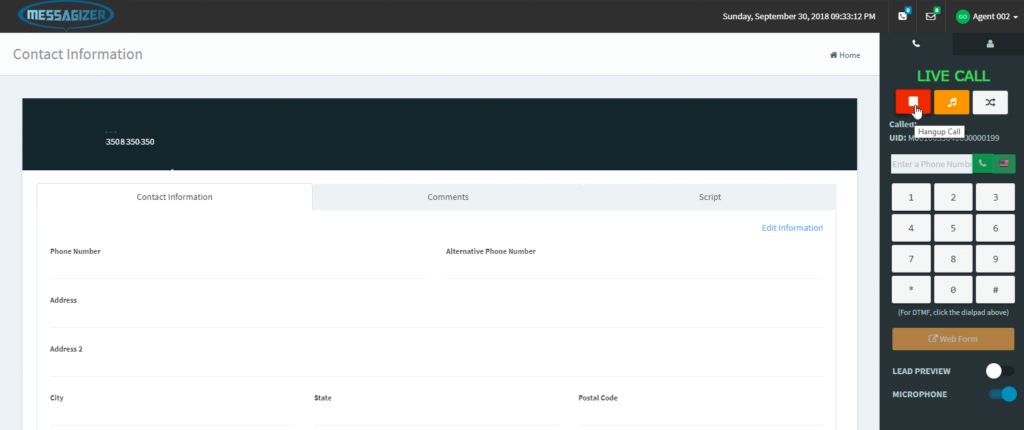
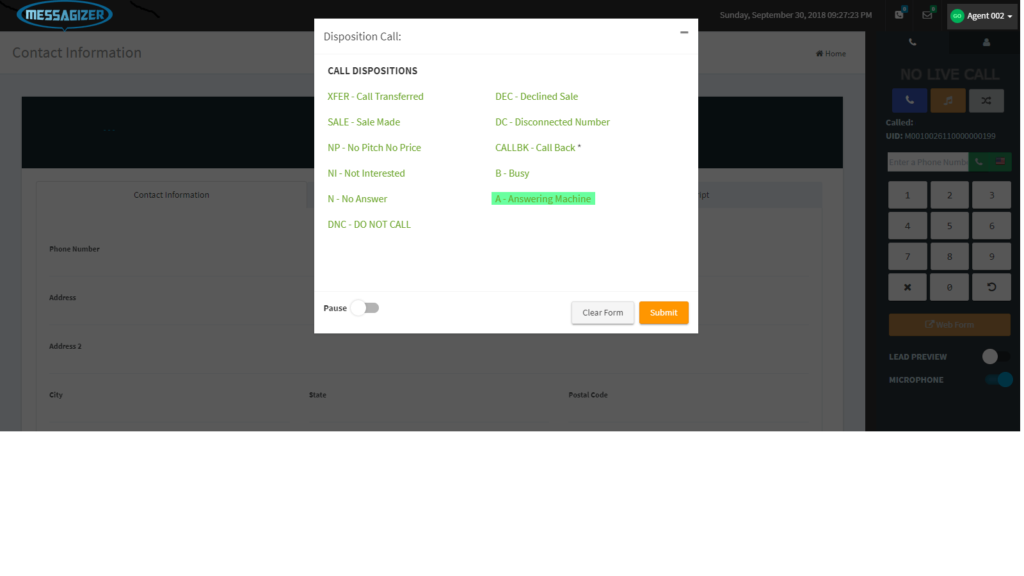
5. Click Hangup Button on the agent portal to hangup the call and select a Call Disposition.
1. Login to your portal as an Admin and Select TELEPHONY AND CAMPAIGNS on the Menu.
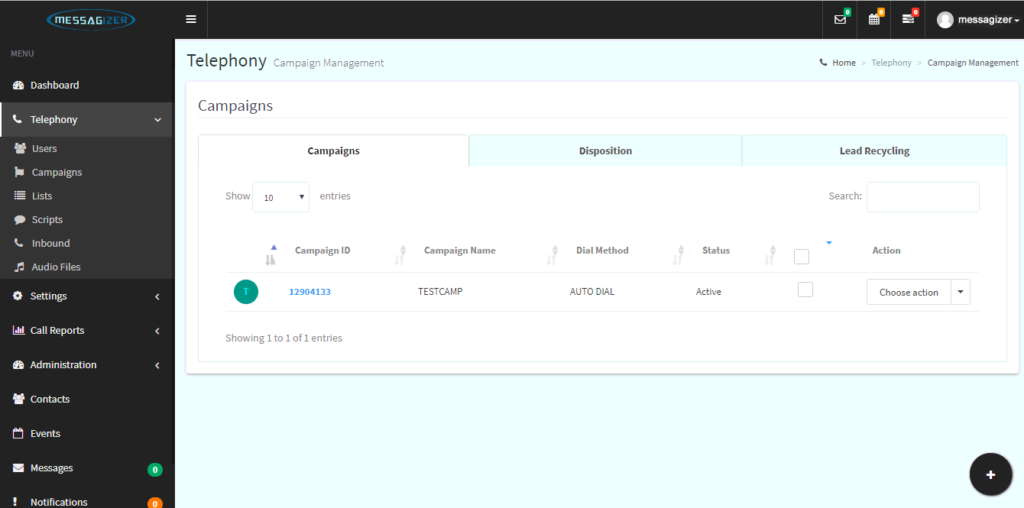
2. Click on right side down corner the + sign Click on ADD NEW CAMPAIGN and select the CAMPAIGN TYPE (Inbound).

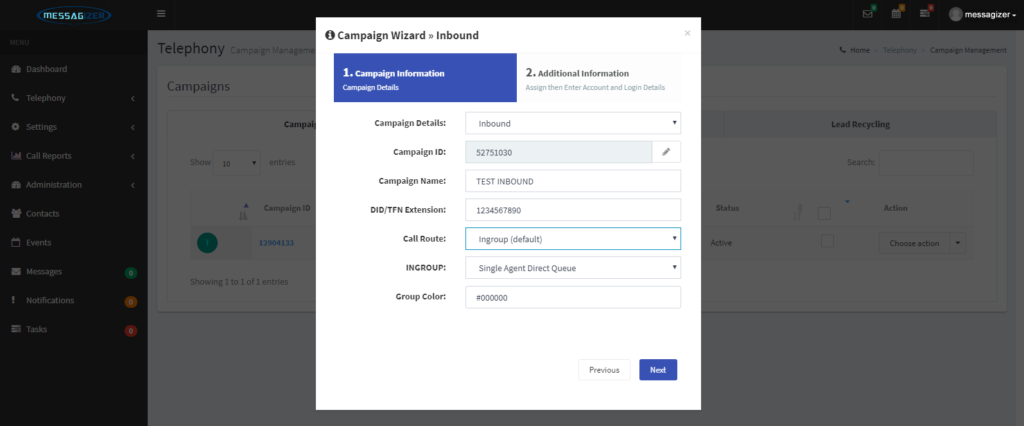
3. Fill up the Campaign Wizard » Inbound and select the call route: Ingroup (default)
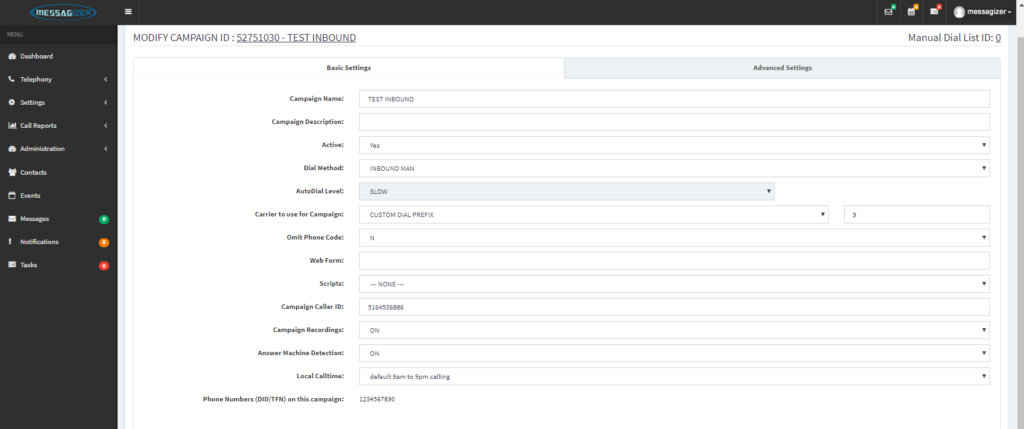
4. Once its created check the Inbound Campaign click the Campaign ID to check the campaign settings. you can also select a preferred settings for your Campaign. “Carrier to use for this Campaign” allows you to choose between Manually created carrier and an existing JustGoVoIP account for your campaign.
Note: On inbound campaign always allow the created ingroup on the advance setting the agent need to select this before they login so they will receive an inbound call.

5. Please advise your agent to select always the ingroup on the INBOUND CAMPAIGN once they are login they only need to press the resume button then wait for the inbound call.

1. Login your admin account on the MENU click TELEPHONY > CAMPAIGNS> DISPOSITION tab
2. Fill up the Status Wizard. Select the Campaign and Set the Status Name once its all filled up Click Submit.
3. Fill up the Campaign Wizard » Inbound and select the call route: Ingroup (default)
4. Once its created check the Inbound Campaign click the Campaign ID to check the campaign settings. you can also select a preferred settings for your Campaign. “Carrier to use for this Campaign” allows you to choose between Manually created carrier and an existing JustGoVoIP account for your campaign.
Note: On inbound campaign always allow the created ingroup on the advance setting the agent need to select this before they login so they will receive an inbound call.
1. To upload your lead file. Click TELEPHONY and LIST. click the + sign button on the bottom right corner to create a new list id.

2. Make sure that you’ve followed the lead file format and save as .csv comma delimited.
3. On the right side. kindly select the LIST ID that you’ve created and enable the duplicate checker so the system will remove the duplicate numbers automatically and lastly select the lead file that you’ve want to upload on the system.
4. Lead status will be posted after you successfully uploaded your lead file, Click Ok once it’s done.
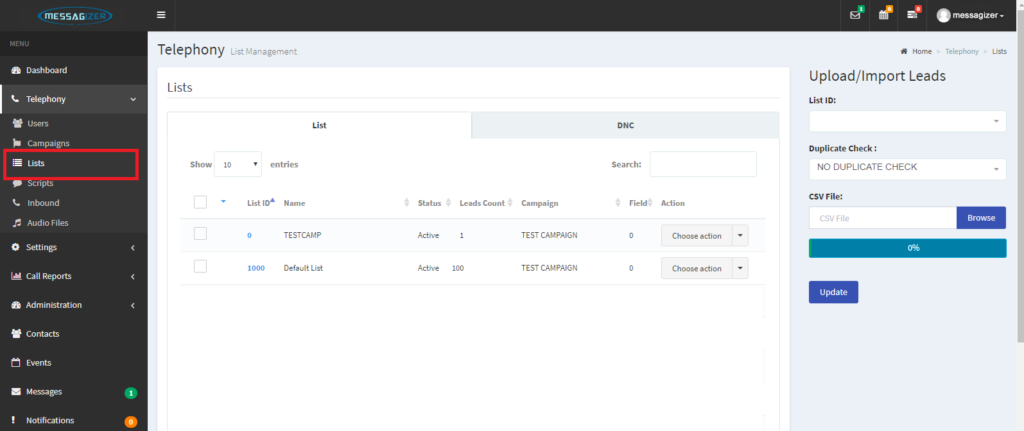
1. Open your admin portal and click Telephony on the top menu and click Lists.
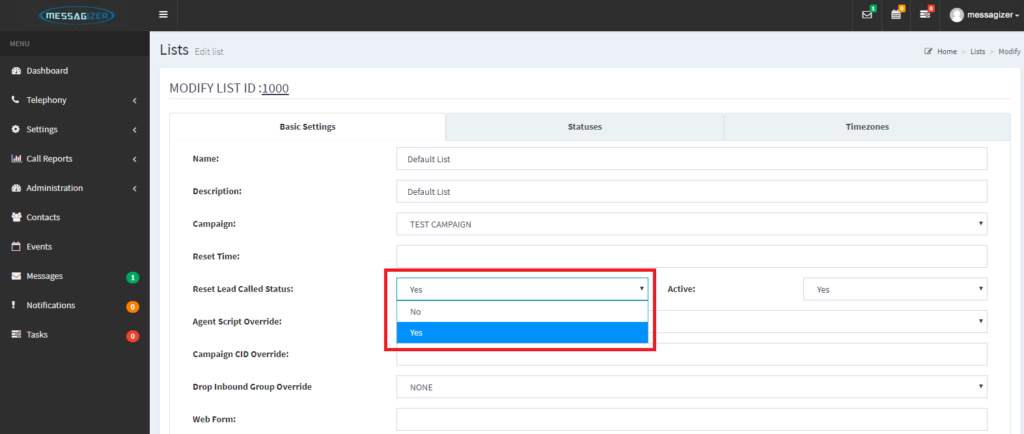
2. Choose the List ID you want to reset your leads.
2.1 Click the drop down to show the option menu.
2.2 Select Modify

3. Change the status of Reset Lead Called Status to Y (Yes) and click Update below.
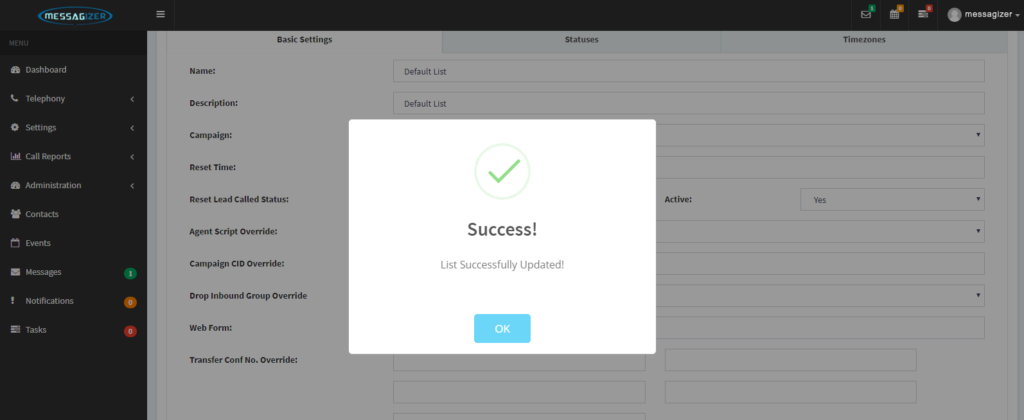
4. Pop up message will appear showing that the work is Success.
Note: Resetting of leads may take up to 3-5 minutes to refresh
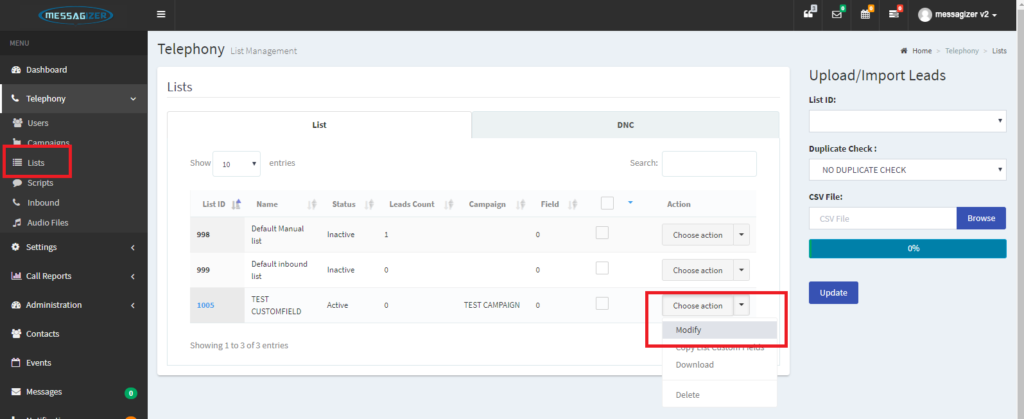
1. From the “List menu”, Select List ID then click on the “Choose Action” then select Modify.
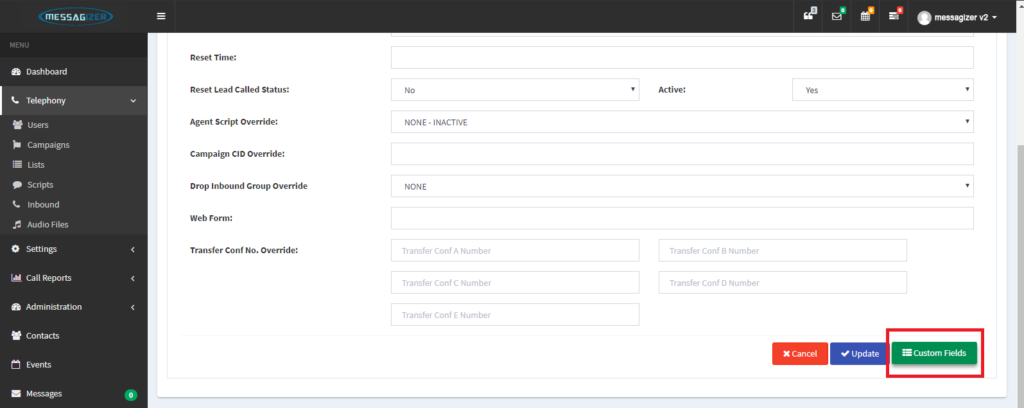
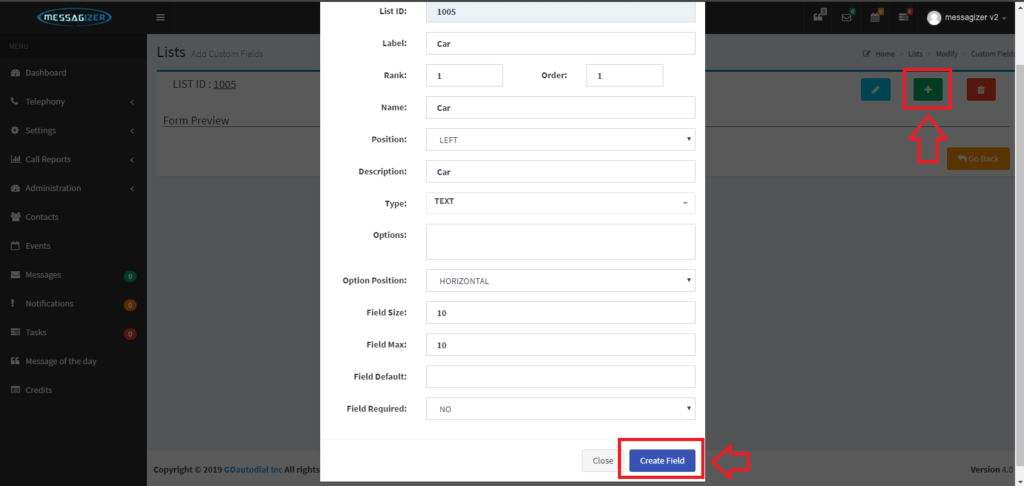
2. Click “Custom Fields” button to add custom fields to your list. Click “Create Field” once you’ve fill out the Fields.
REMINDER:
Label = Do not use special characters or spaces
Name = This field will show on the agents screen and when you are uploading leads.
Options = This should be the same with “Labels” and should be in between “–A–” sample “–B–“. i.e. –A–company_name–B–
Option Position = The direction of custom field that will appear on agent UI
Field Size = Text box size that will show on the agent UI
Field Max = Max character that you can input on the custom field
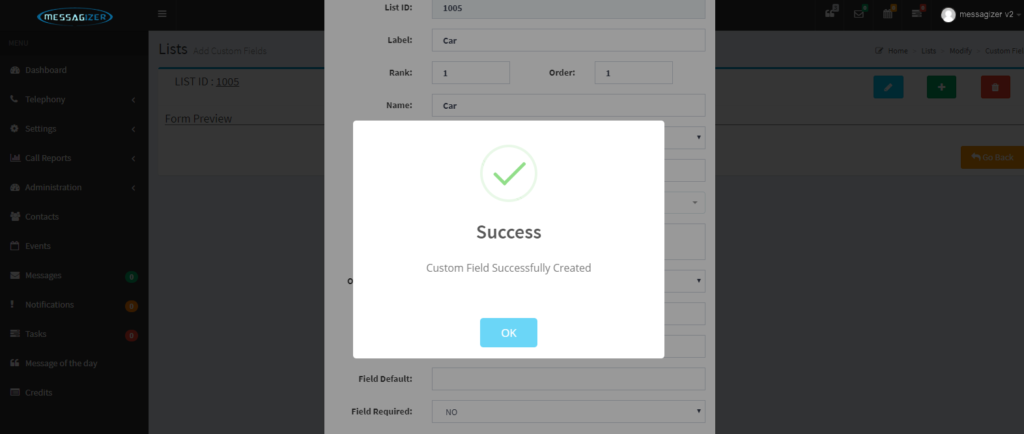
3. Confirmation message click “Yes create custom field” and notification will pop “Custom Field Successfully Created”
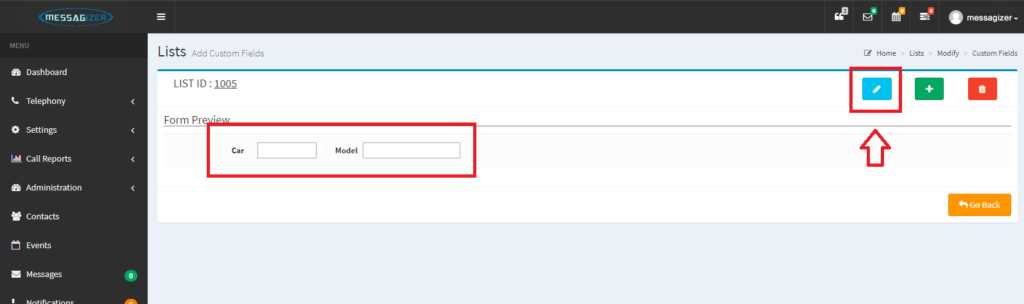
NOTE: We have created 2 additional custom field examples on this tutorial (Car, Model)
4. Here’s the preview of the custom fields. if you want to edit your custom field just click the “Pencil” then update field once its done.
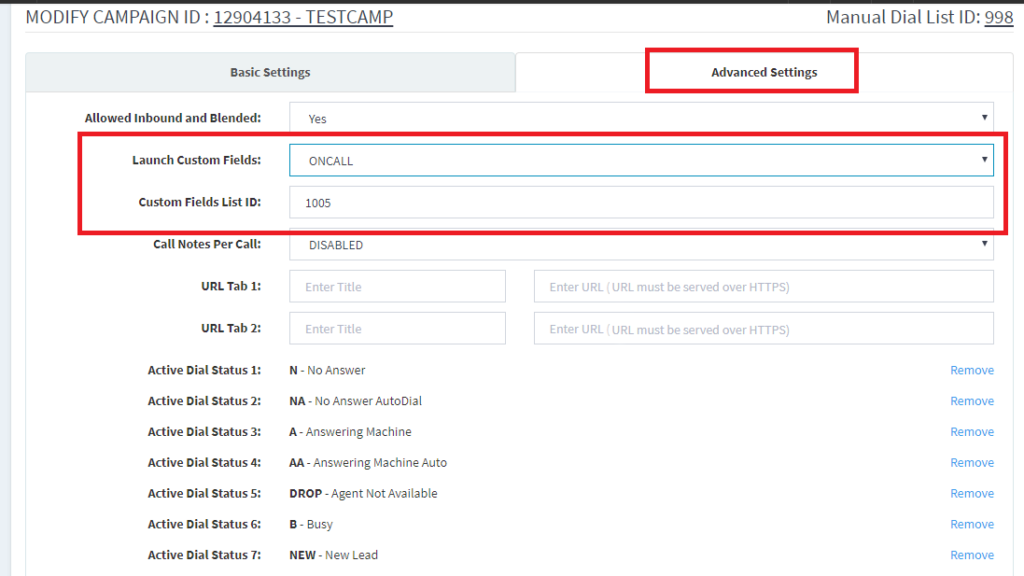
5. Campaign Settings set the following:
a. Launch Custom Fields = ONCALL
b. Custom Fields List ID = 1005 (your list with custom fields)
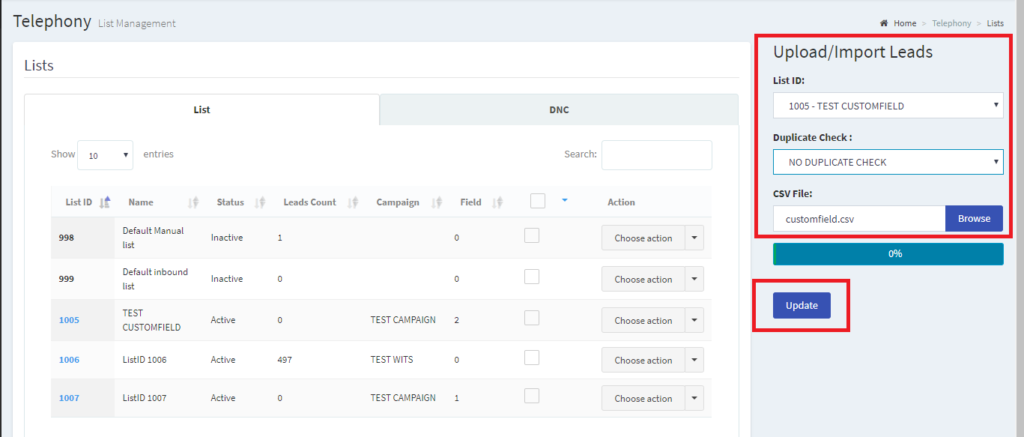
*Howto Upload Leads with Custom Fields
NOTE:Kindly follow the lead file format all the custom field must be next to comments field. and it must be saved as .csv

1. Upload your lead file with custom fields and make sure to choose the correct “LIST ID”. Click “Update” once you’ve selected the List ID and the Lead file with custom field you can also use the duplicate checker. Once its done there will be a pop up informing you that the leads has already been uploaded.
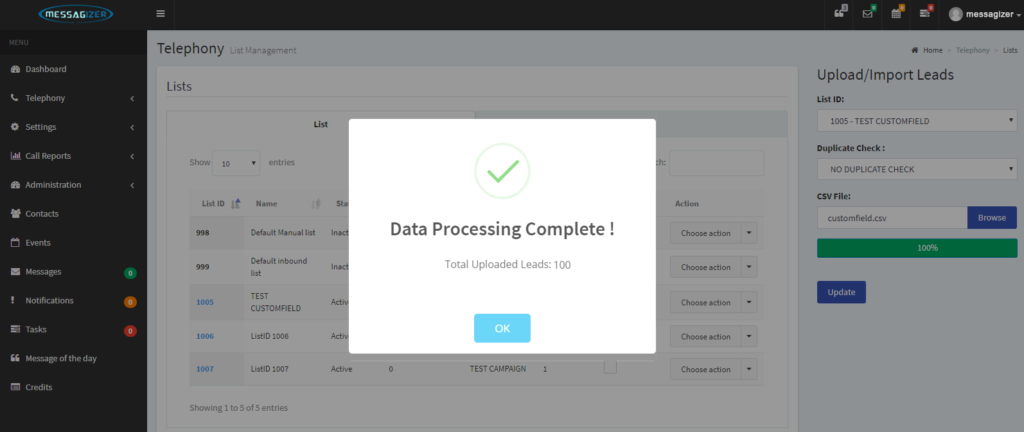
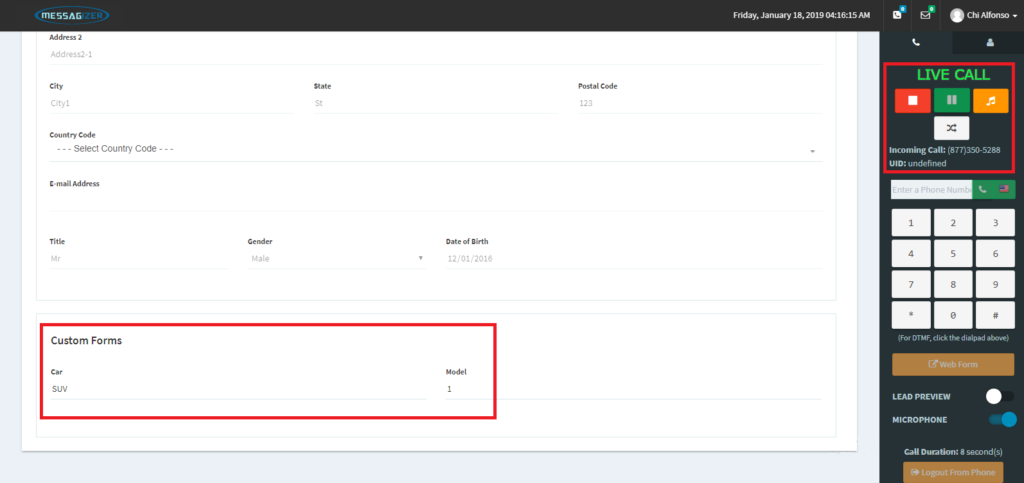
2. Once the uploading of the leads is done, you can now activate your list id and advise your agent to login to the campaign. Once the agent gets a “LIVE CALL”, the customfields are on bottom of the agent UI.
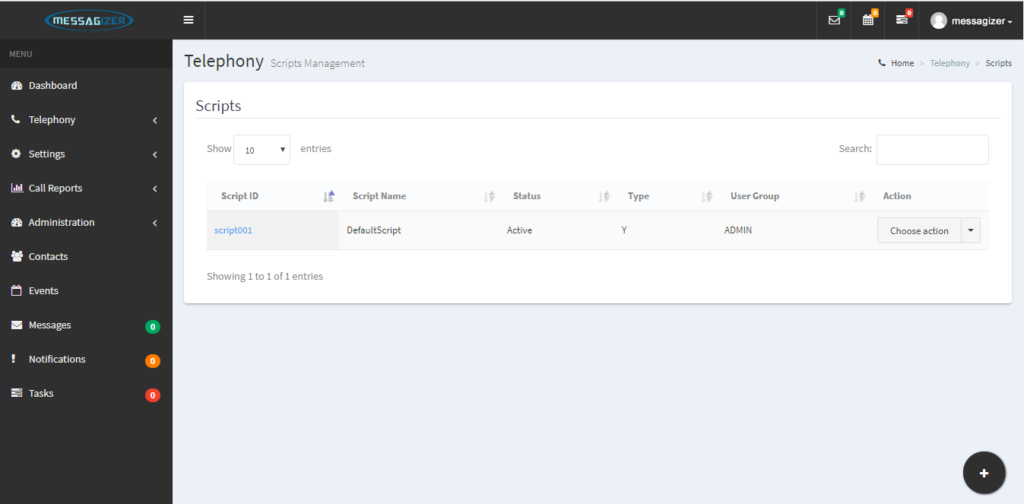
1. Login your admin account on the MENU click TELEPHONY > SCRIPTS and Click + sign.
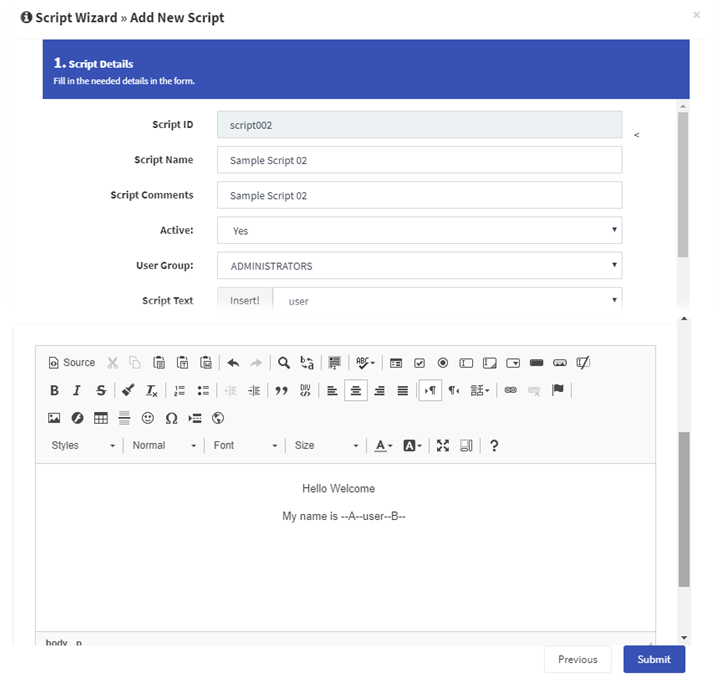
2. Fill up the Script Details and Click Submit.
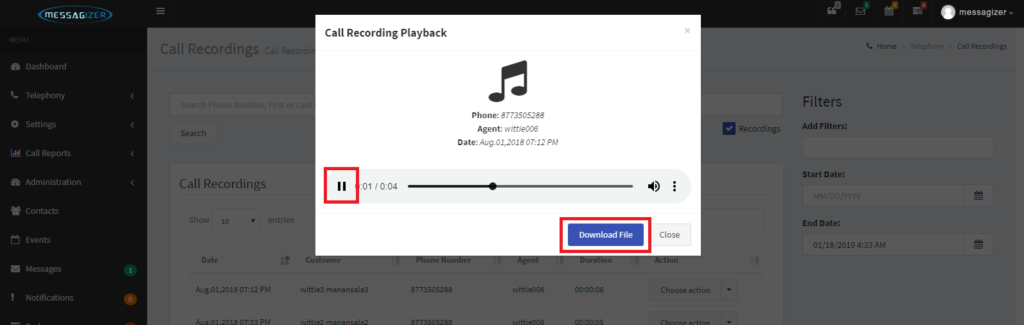
1. Navigate to Call Reports and select Call Recordings.

2. Input the desired Phone number on the search box. you may also filter it by adjusting the date frame and which agent recordings you want to download or check.
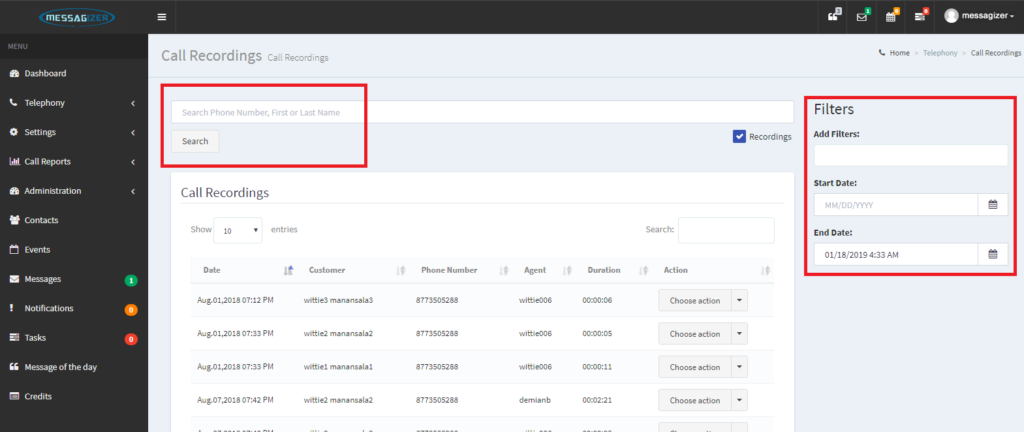
3. After the phone number shown click the Choose Action drop option, Then click the Download Call Recordings you can also play the recoding file by clicking Play Call Recording.
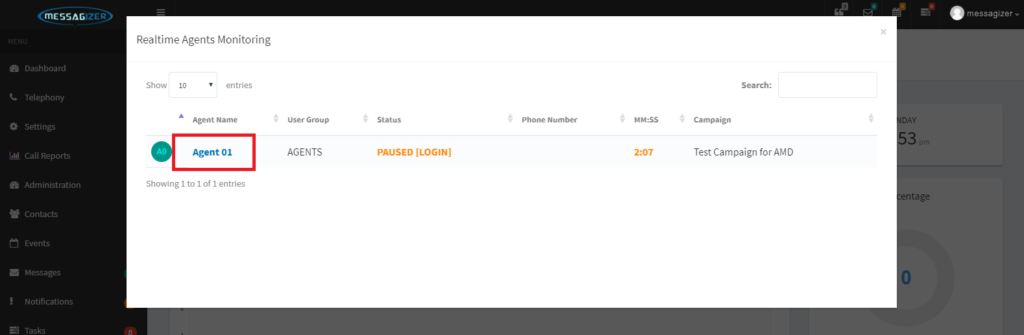
1. Log in your admin account. and click DASHBOARD > AGENT on CALL > click the Agent ID.
2. You may choose either BARGE / LISTEN
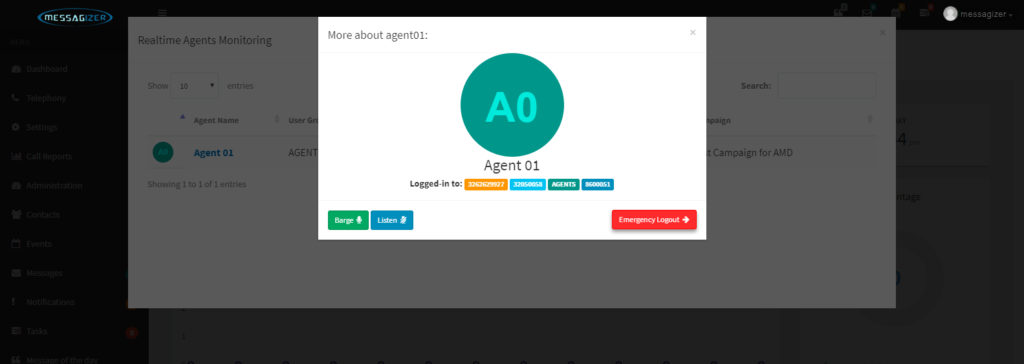
3. Once you choose either BARGE / LISTEN a timer will pop up indicating that you are currently on a BARGE / LISTEN.
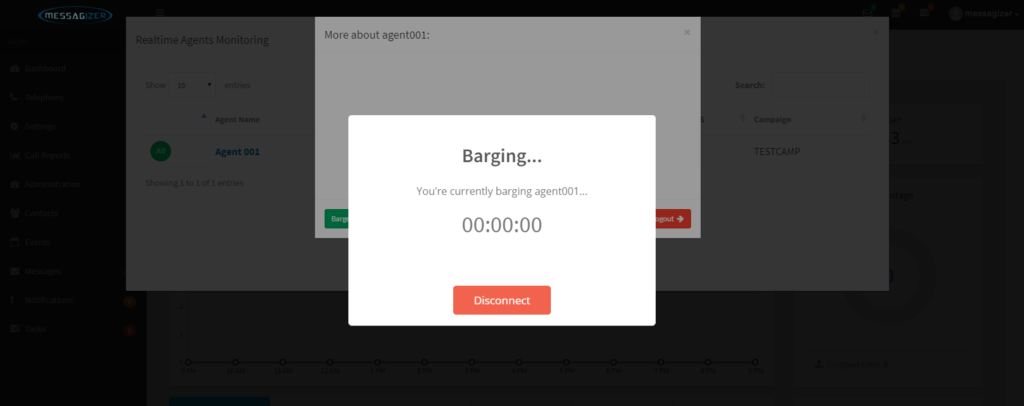
4. Click Disconnect once its done.
1. You can force log-out an agent on the dashboard. just click the “Agents On Call” then click the Agent ID.

2. Click the EMERGENCY LOGOUT on the pop-up screen then click proceed to finish.


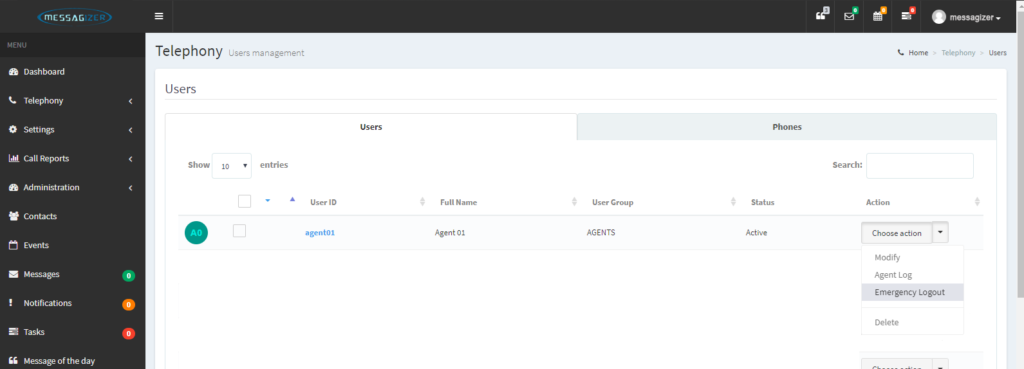
3. You can also force log-out them by clicking on the MENU > TELEPHONY > USERS.

4. Click CHOOSE ACTION and on the drop down selection click EMERGENCY LOGOUT then proceed to finish.
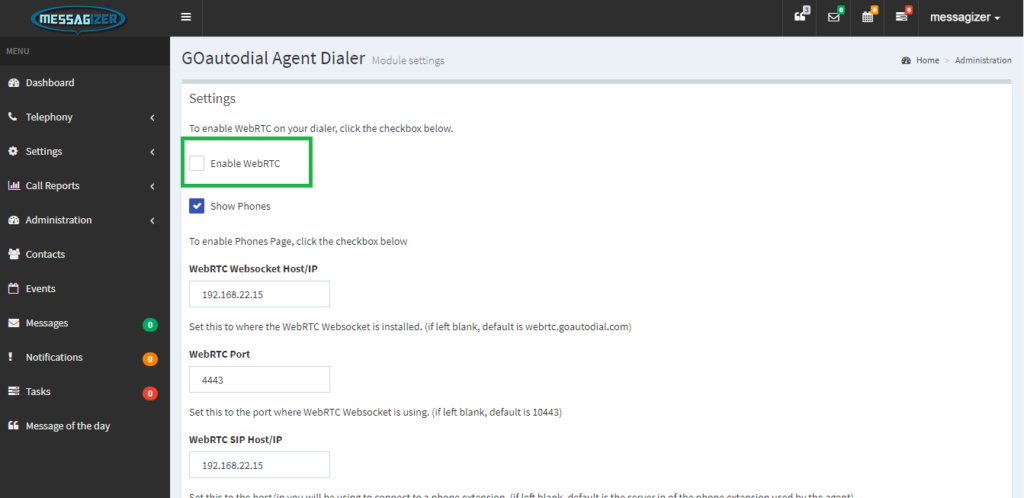
1. Navigate to Administration > GOWebRTC Dialer Settings and uncheck/untick the Enable WebRTC.
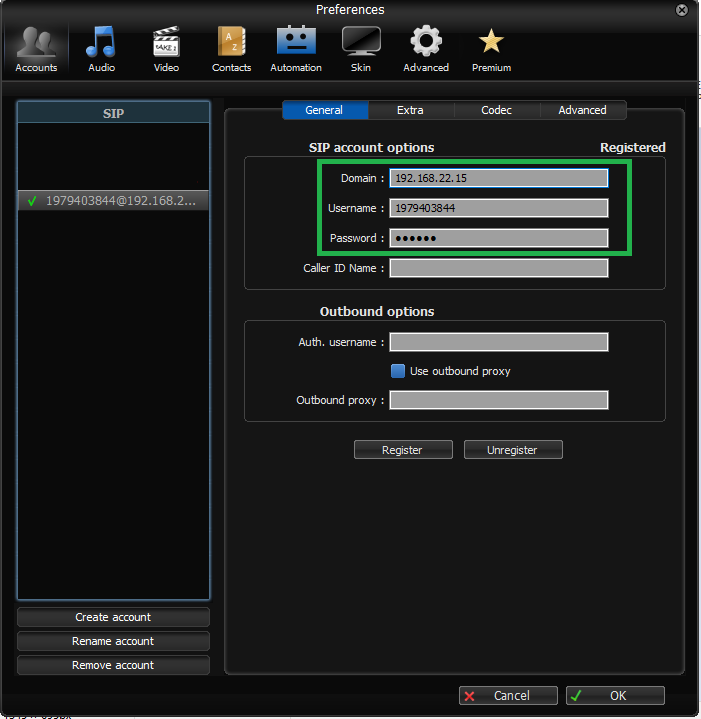
2. Navigate to Telephony > Users > Select your User and Scroll down to Phone Login.

3. On your Softphone input the Phone Login as your Username and your User password for Password. On the Domain field set your Dialer IP address or you may use your dialer valid domain.
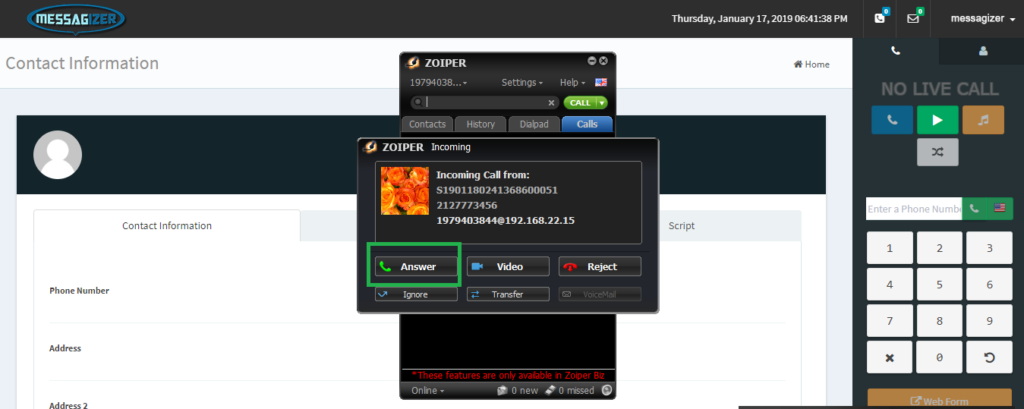
4. Upon login the softphone will ring. Click Answer and you should be able to hear a voice prompt “You are the only person in this conference” confirming you logged in successfully.
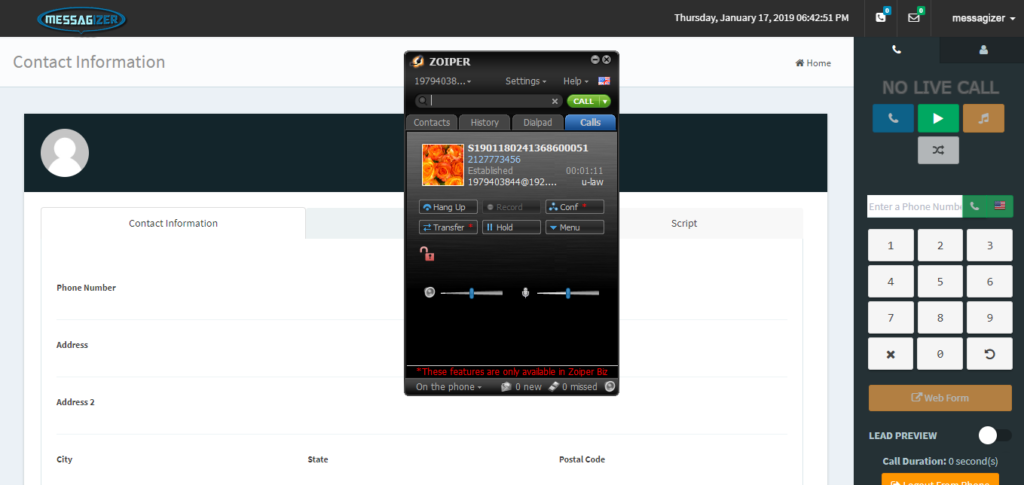
• DO NOT HANG UP your softphone (It will disconnect you from the agent web session on your browser)
• Minimize your softphone and you proceed to make calls.
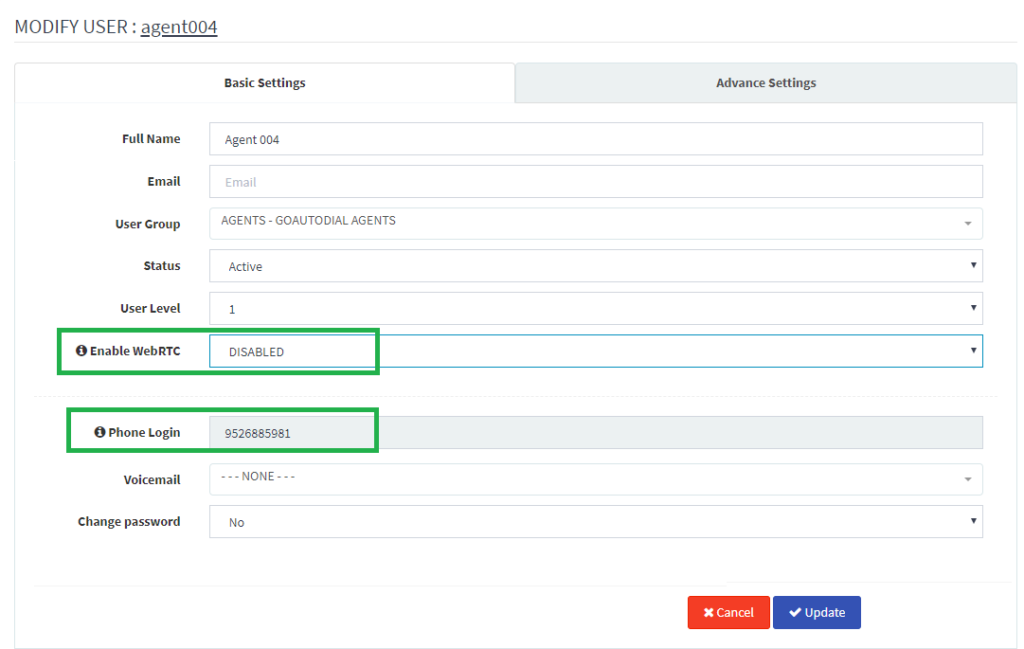
1. GoTo> GoAdmin>Telephony>Users>Choose your agent.
2. Set Enable WebRTC=DISABLE
3. Copy phone login in your notepad and Click UPDATE button
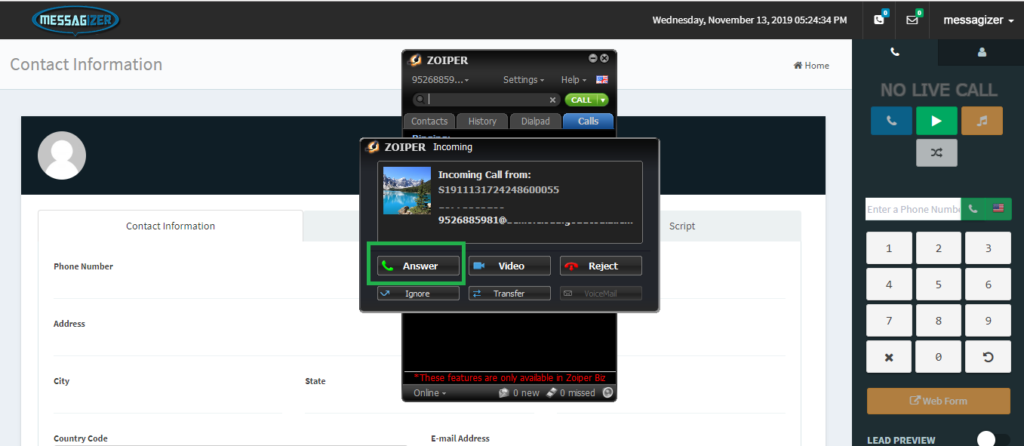
2. Configure your softphone.

3. Login as agent. Your softphone should ring and will give you a pop up message to answer, click the ANSWER button and you should hear a voice prompt “You are the only person in this conference”.
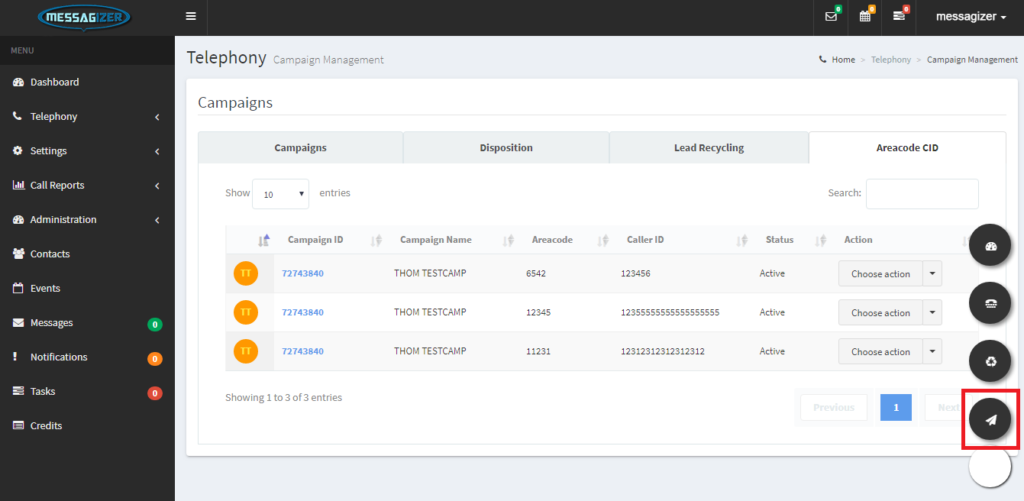
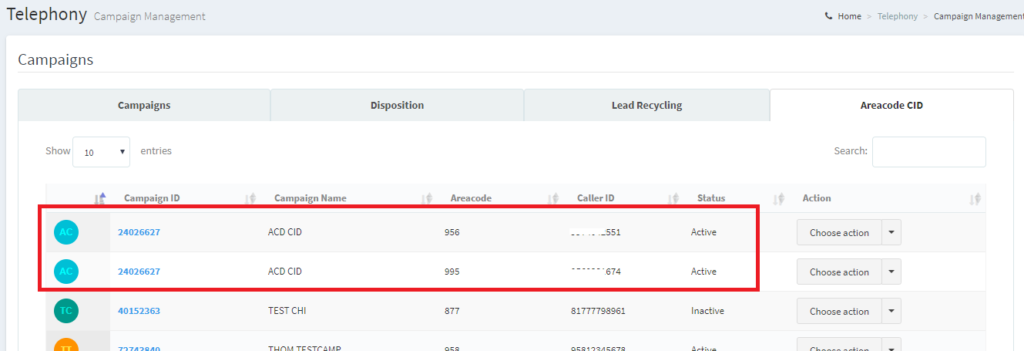
1. Go to Telephony > Campaigns > click Areacode CID tab.
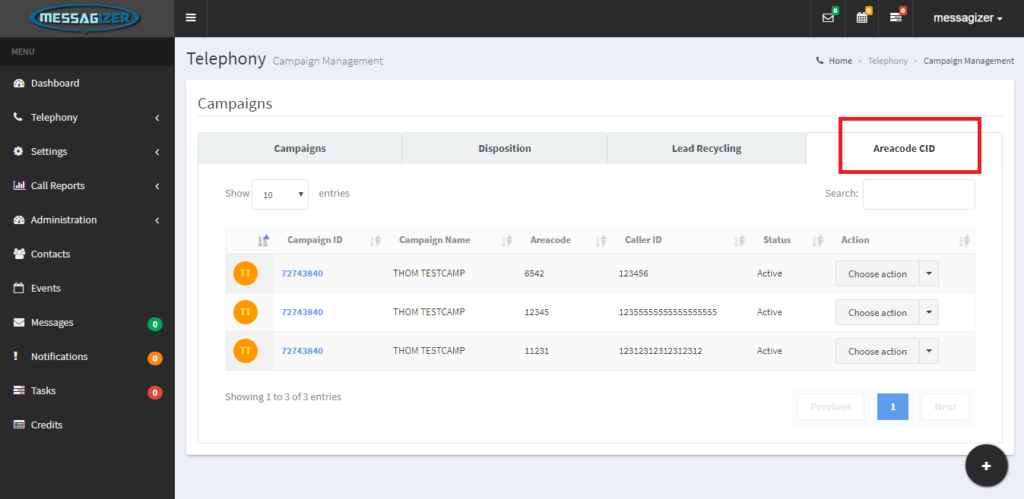
2. click the “+” button on the lower right corner. click Create Areacode.
3. Fill up the wizard. which area code and caller id you want to assign.

Sample:
Areacode A = 956 – AC-CID …….551
Areacode B = 995 – AC-CID …….674
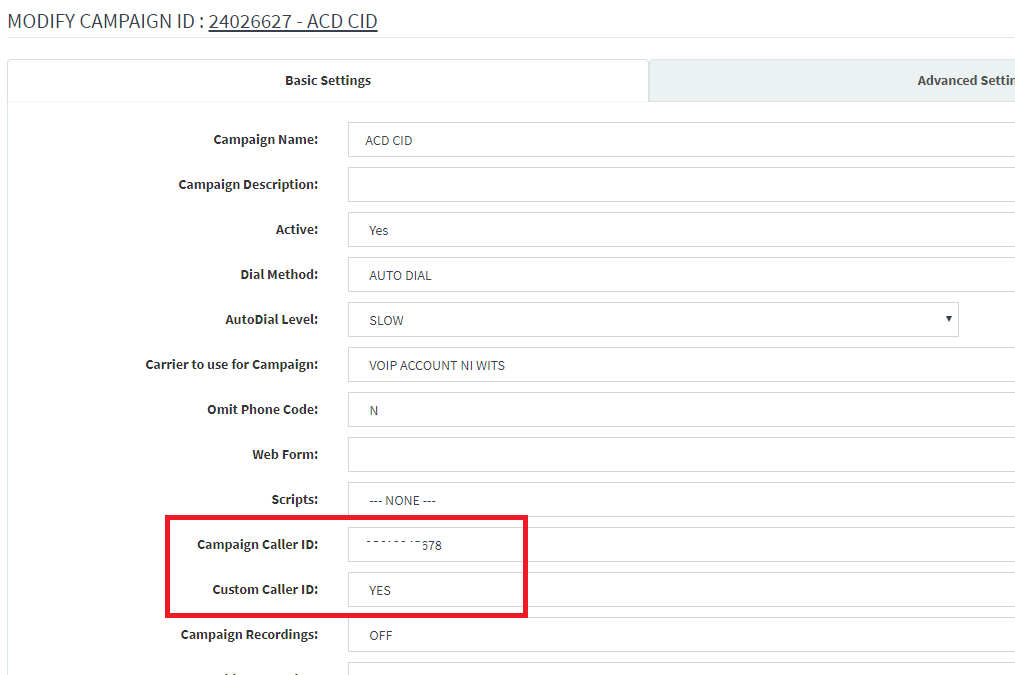
Campaign Default CID – ……678
4. Once its created go to the campaign and enable it.
Takenote
NO = Will use the default Caller ID of the Campaign.
YES = this option allows you to use the security_phrase field in the list table as the CallerID to send out when placing for each specific lead. If this field has no CID in it then the Campaign CallerID defined above will be used instead.
TEST CALL.
AREA CODE A
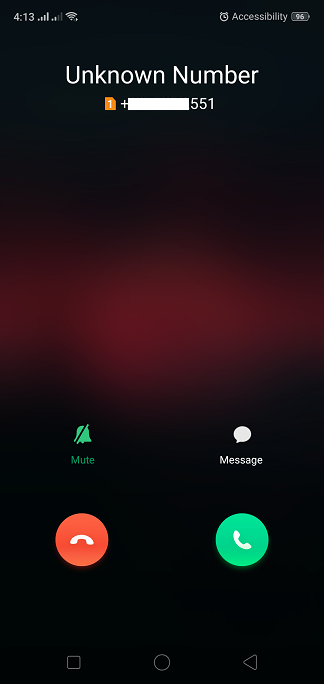
AREA CODE B
Disabled Areacode CID
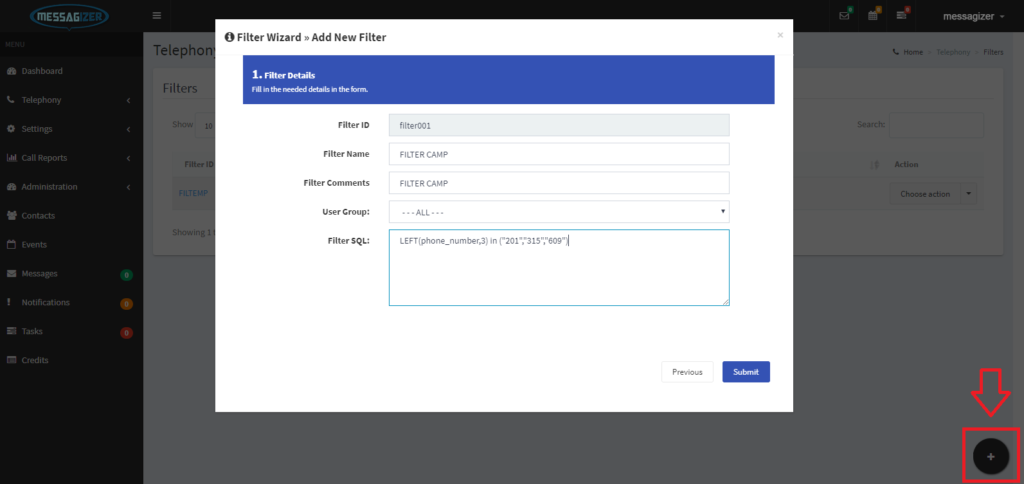
1. Example you want to filter your leads by dialing only the numbers starting with 201 , 315 and 609
2. On the admin account. Click Telephony > Filters.
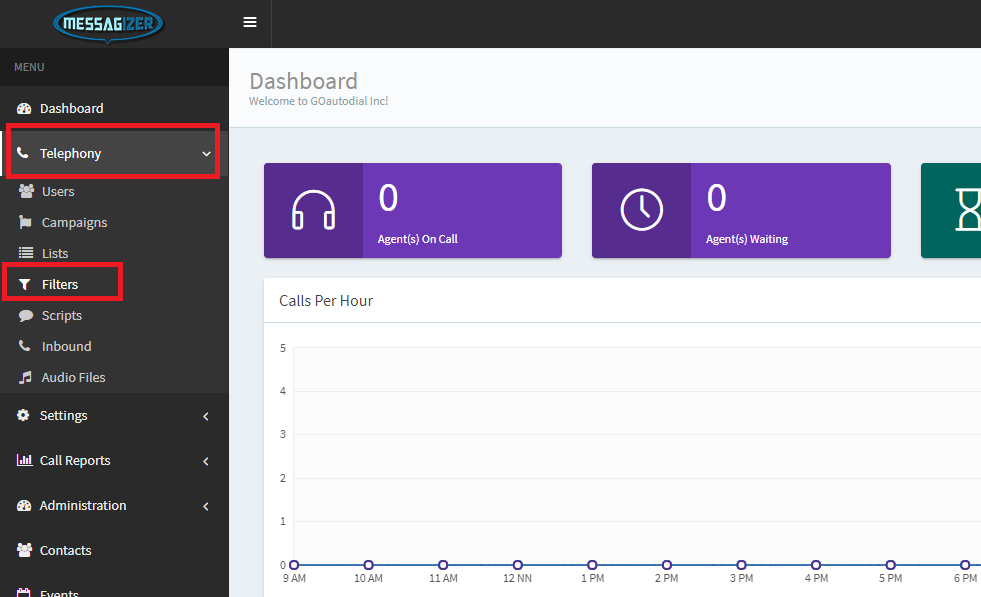
3. Click the “+” button on the lower right corner then fill up the wizard.
Filter SQL This is where you place the SQL query fragment that you want to filter by. do not begin or end with an AND, that will be added by the hopper cron script automatically. an example SQL query that would work here is- called_count > 4 and called_count < 8
4. Assign the created filter on the campaign advance settings.
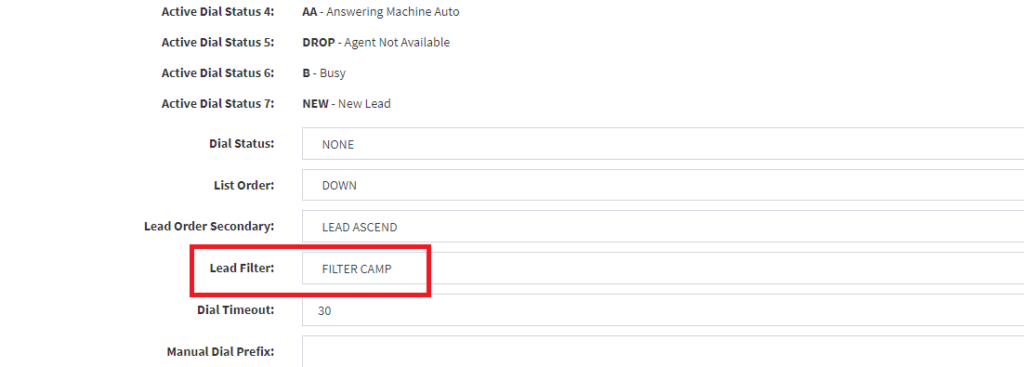
5. After selecting the lead filter on Campaign Advance settings. Reset the leads on the hopper once its done it will only load the number starting with 201, 315 and 609.

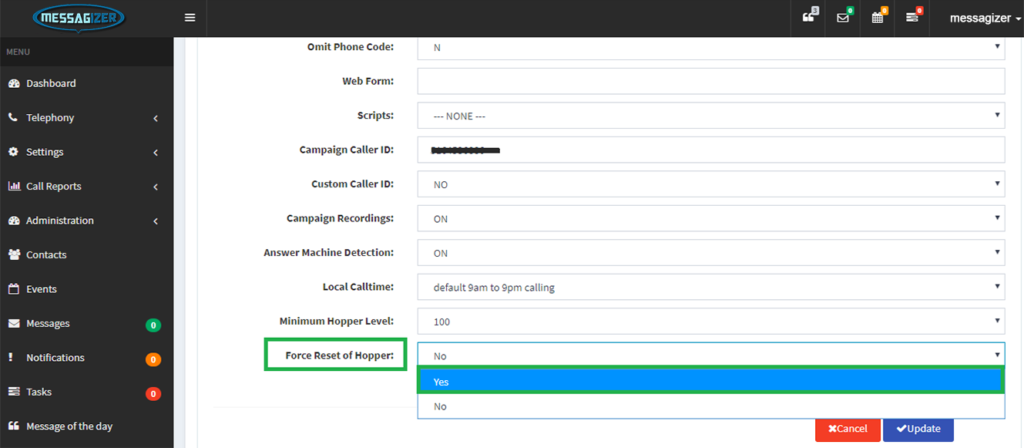
1. Login to your portal as an administrator and Select TELEPHONY>CAMPAIGNS>ADVANCE SETTINGS.
2. Set your List Order based on your requirements
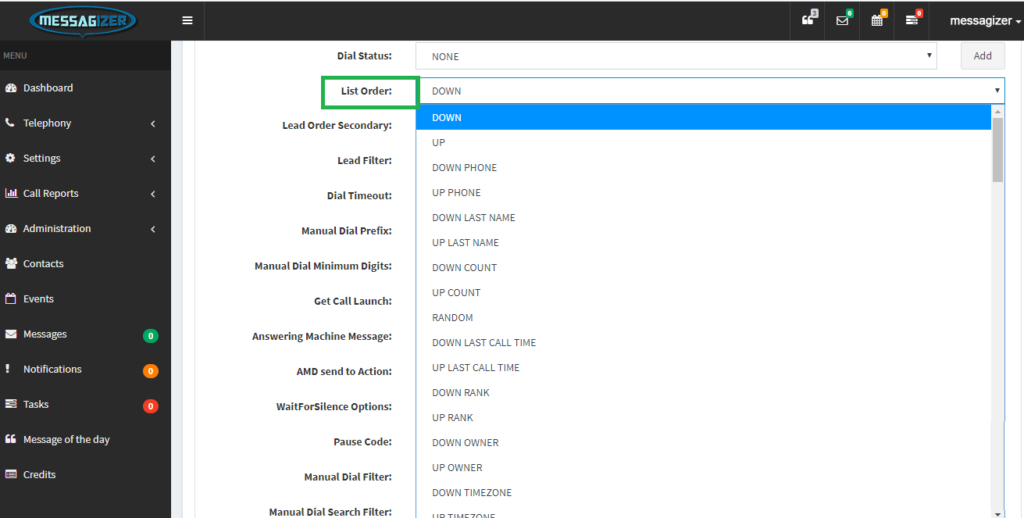
List Order -This menu is where you select how the leads that match the statuses selected above will be put in the lead hopper:
– DOWN: select the first leads loaded into the list table
– UP: select the last leads loaded into the list table
– UP PHONE: select the highest phone number and works its way down
– DOWN PHONE: select the lowest phone number and works its way up
– UP LAST NAME: starts with last names starting with Z and works its way down
– DOWN LAST NAME: starts with last names starting with A and works its way up
– UP COUNT: starts with most called leads and works its way down
– DOWN COUNT: starts with least called leads and works its way up
– DOWN COUNT 2nd NEW: starts with least called leads and works its way up inserting a NEW lead in every other lead – Must NOT have NEW selected in the dial statuses
– DOWN COUNT 3nd NEW: starts with least called leads and works its way up inserting a NEW lead in every third lead – Must NOT have NEW selected in the dial statuses
– DOWN COUNT 4th NEW: starts with least called leads and works its way up inserting a NEW lead in every forth lead – Must NOT have NEW selected in the dial statuses
– RANDOM: Randomly grabs lead within the statuses and lists defined
– UP LAST CALL TIME: Sorts by the newest local call time for the leads
– DOWN LAST CALL TIME: Sorts by the oldest local call time for the leads
– UP RANK: Starts with the highest rank and works its way down
– DOWN RANK: Starts with the lowest rank and works its way up
– UP OWNER: Starts with owners beginning with Z and works its way down
– DOWN OWNER: Starts with owners beginning with A and works its way up
– UP TIMEZONE: Starts with Eastern timezones and works West
– DOWN TIMEZONE: Starts with Western timezones and works East
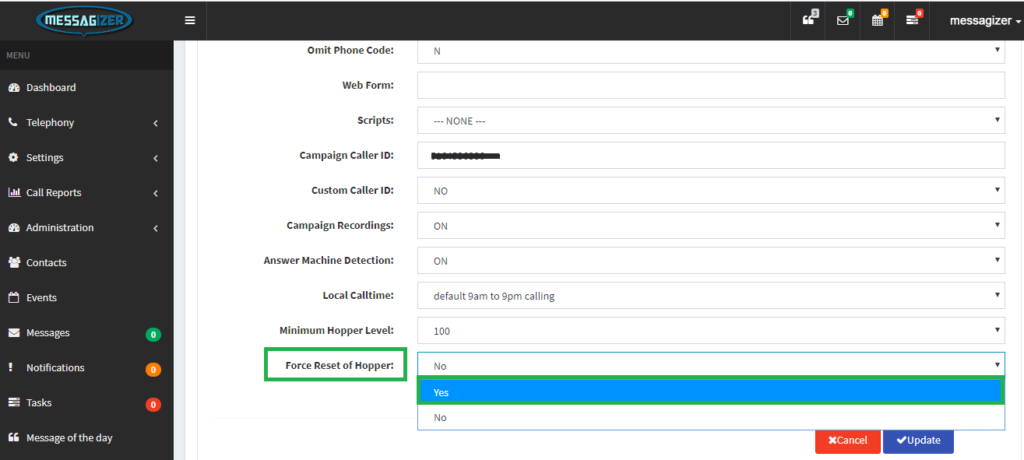
3. Set Force Reset of Hopper = YES and click UPDATE button to apply the changes immediately.
1. Login to your portal as an administrator and Select TELEPHONY>CAMPAIGNS>ADVANCE SETTINGS.
2. Set your Lead Order Secondary based on your requirements
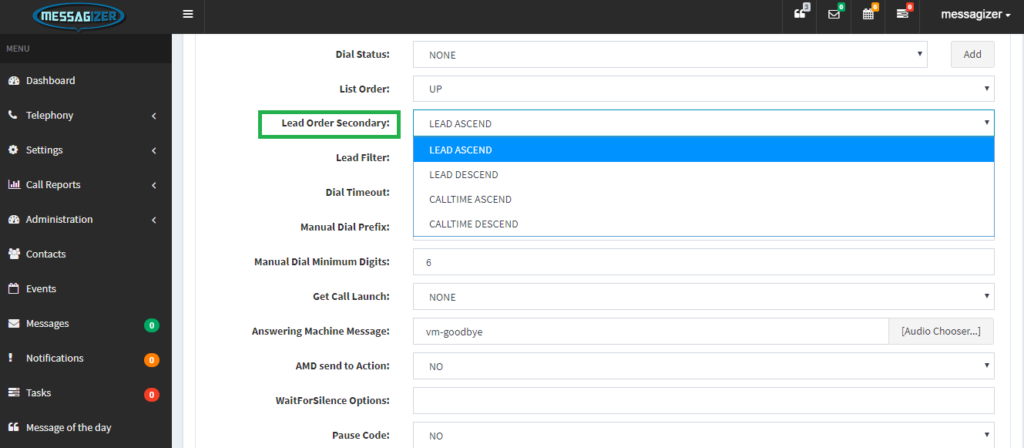
List Order Secondary -This option allows you to select the second sorting order of the leads in the hopper load after the List Order and within the results defined by the criteria set above. For instance, the List Order will be used for the first sort of the leads, but the results will be sorted a second time within that sorting across the same set of the first List Order. For example, if you have List Order set to DOWN COUNT and you only have leads that have been attempted 1 and 2 times, then if you have the List Order Secondary set to LEAD_ASCEND all of the attempt 1 leads will be sorted by the oldest leads first and will be put into the hopper that way. Default is LEAD_ASCEND. NOTE, if you have a large number of leads using one of the CALL TIME options may slow down the speed of the hopper loading script. If List Order Randomize is enabled, this option will be ignored
3. Set Force Reset of Hopper = YES and click UPDATE button to apply the changes immediately.
1. Input phone number in text field and click dial icon
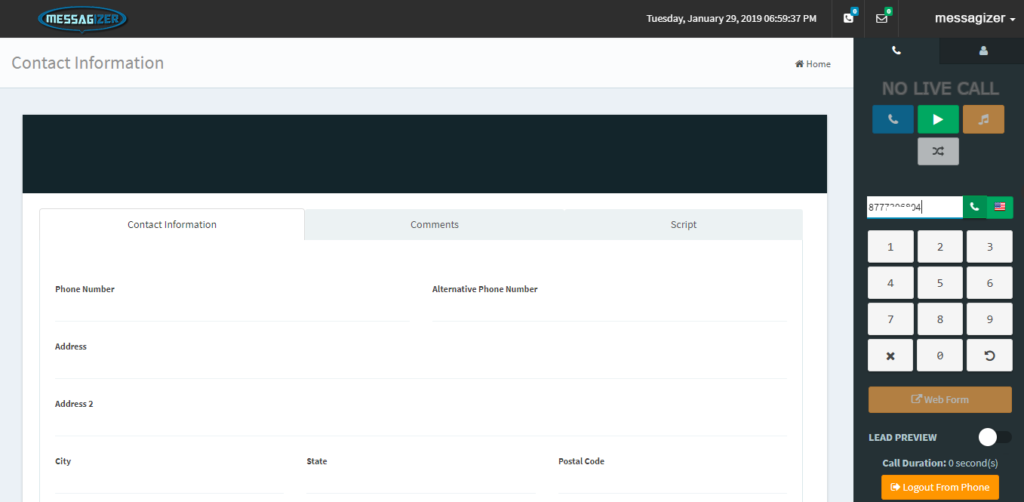
2.When LIVE CALL displayed click Edit Information
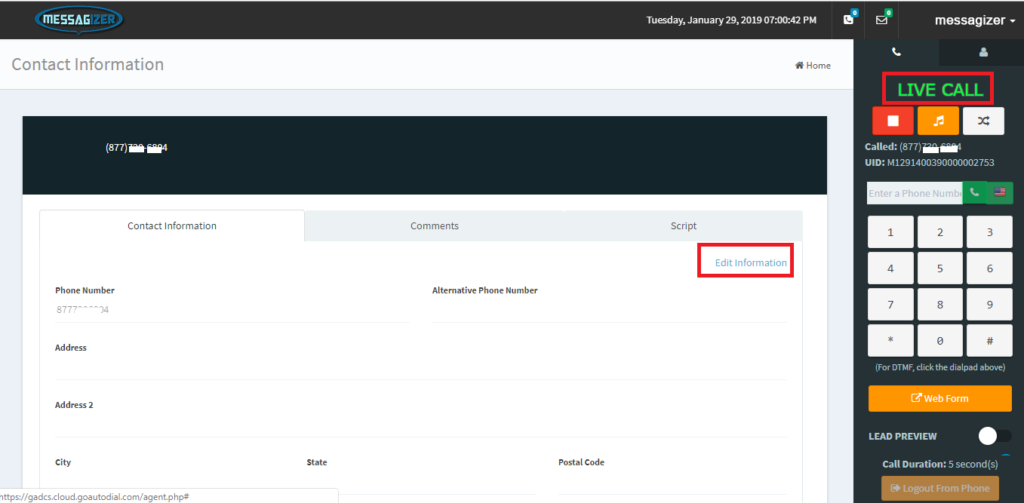
3. Click the under score or information displayed. Click checkbox to Save information.
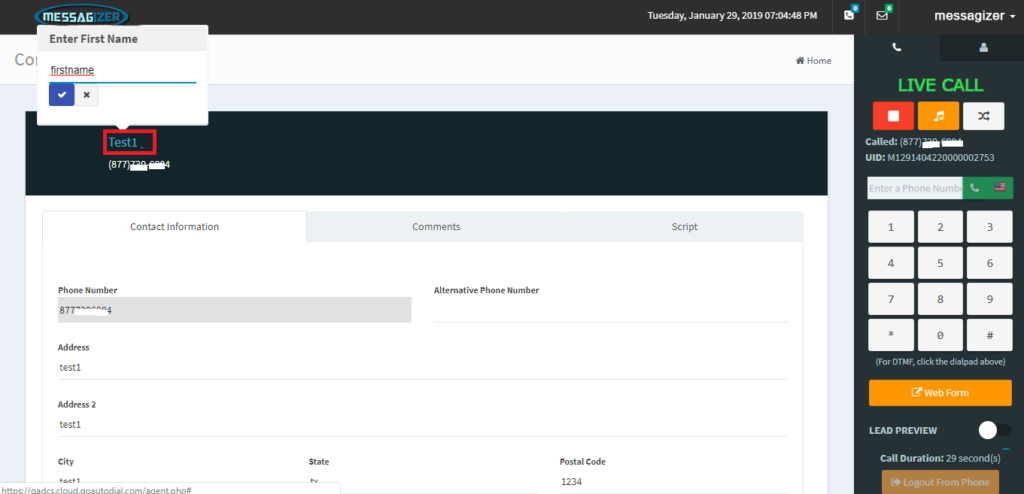
4. Hangup the call and choose disposition.
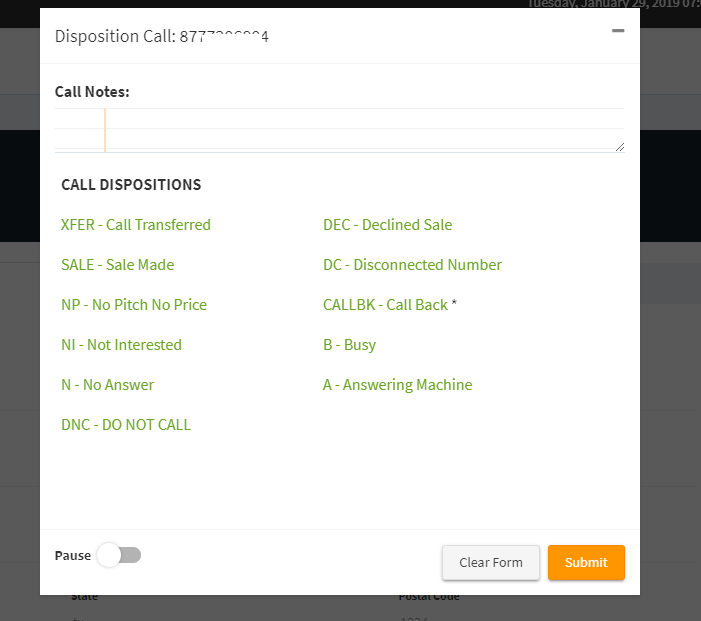
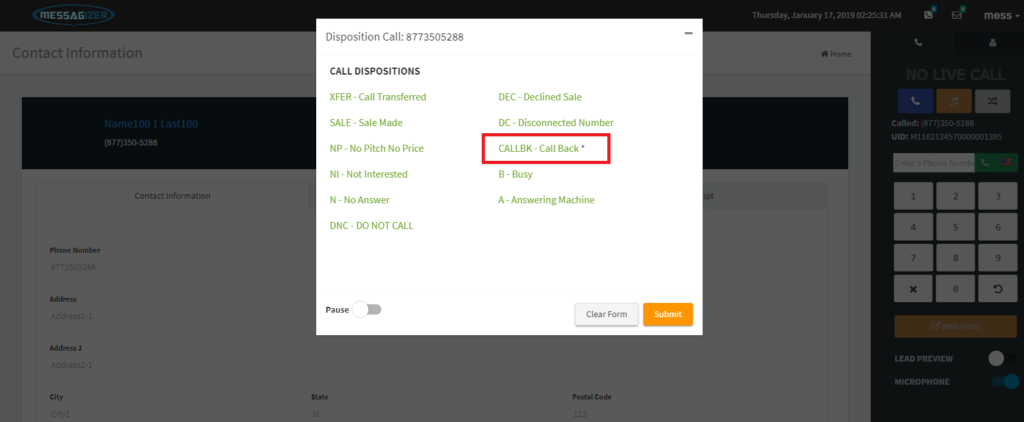
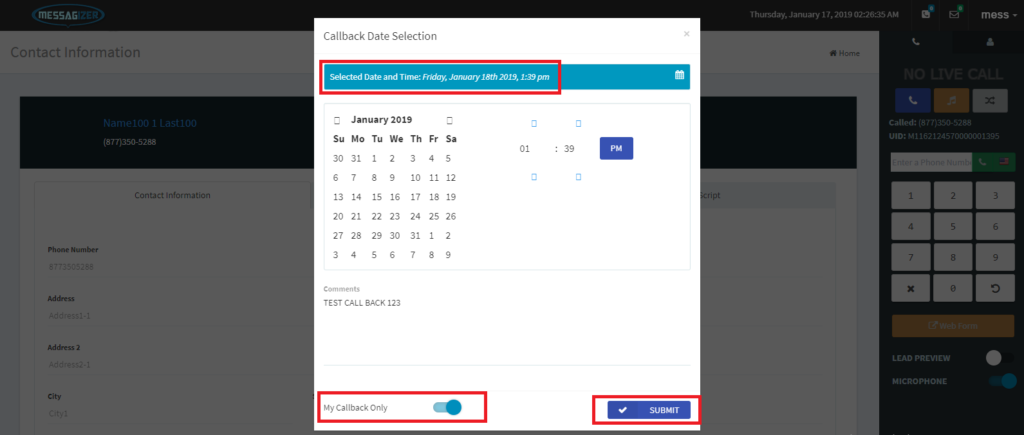
1. Login to the Agent Portal. once the client wants a call back, Dispose the call as CALL BACK and select the date and time for the schedule.
Note: You can use the Comment Field box in case you have to take down notes of the call and set it as My Own Callback Only then hit submit.
2. Once a scheduled call back is on due date a CALL BACK will pop-up.

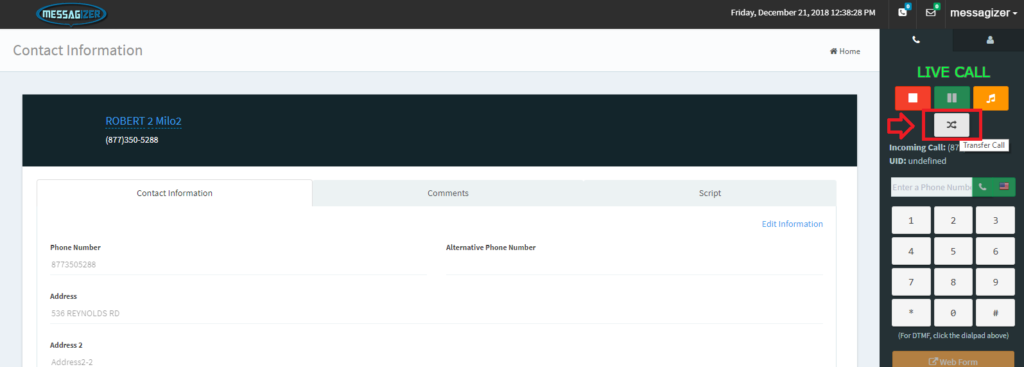
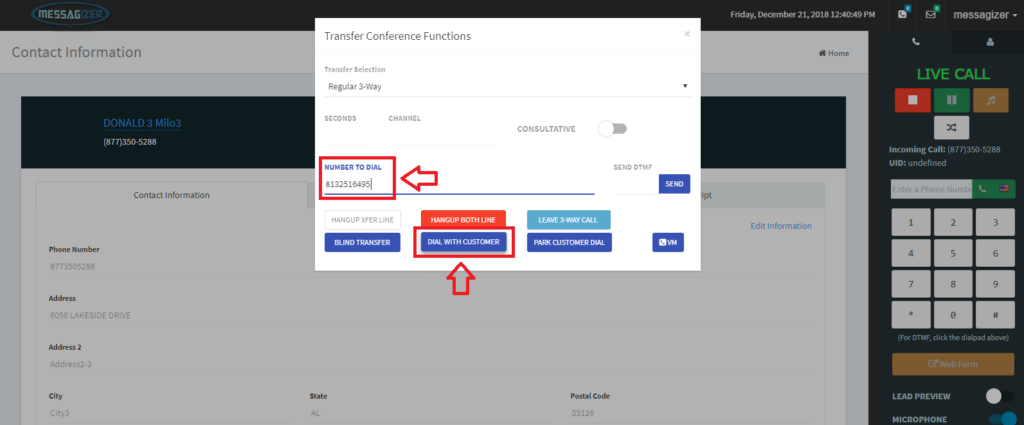
1. When you are in Live Call click the Transfer Button.
2. Select Regular 3-Way You will see the Transfer Conference Functions then input the Phone Number to Call and click “DIAL WITH CUSTOMER”.
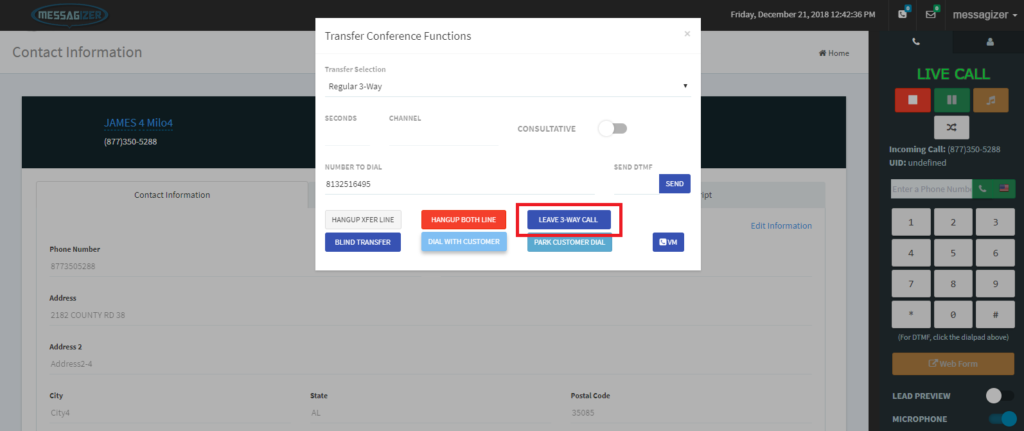
3. Once the Third call are connected you can click the Leave 3 – Way Call Button
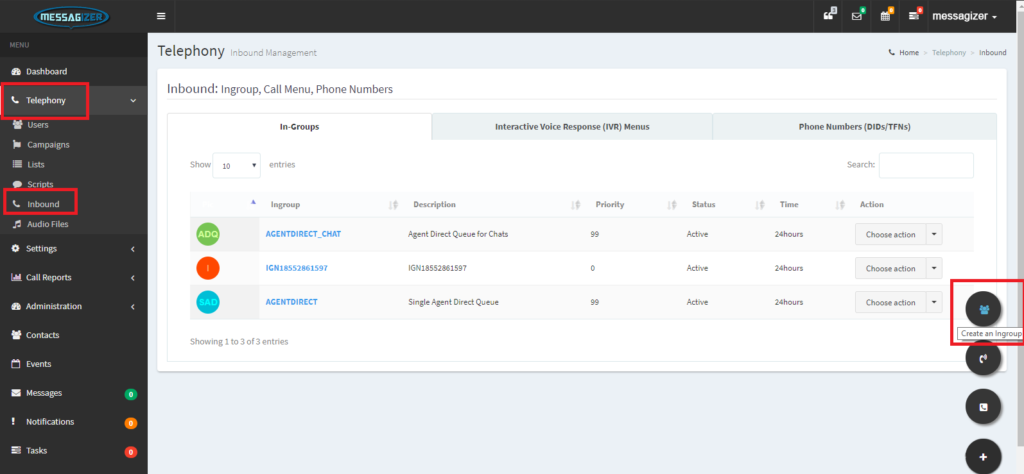
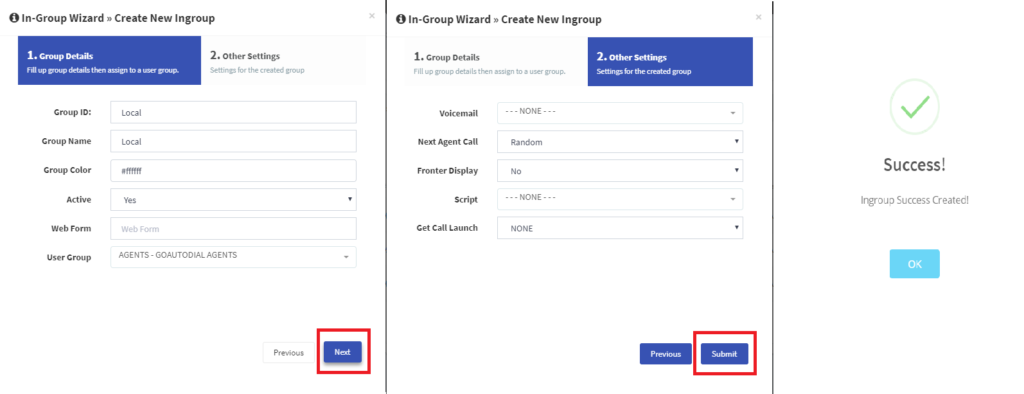
1. Create an Ingroup for your closer agents.Hover to Telephony > Inbound on the lower right corer click the “+” button then create an Ingroup.
2. Fill out the Wizard for the Name of the Ingroup then click “Next” > “Submit” once its done there will be a pop-up “Success! Ingroup was Created” to notify that the Ingroup was created properly.
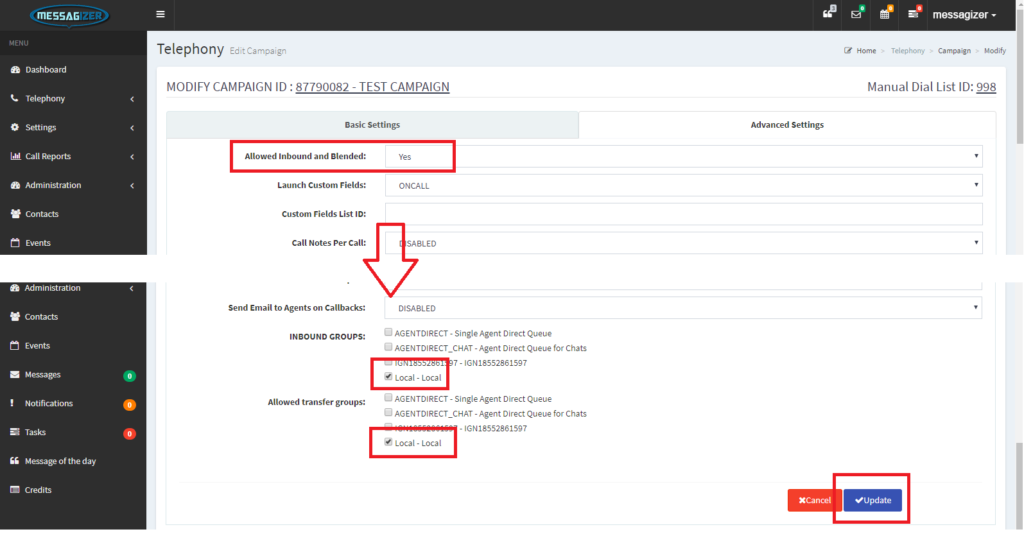
3. Once its Created go to your Campaign and allow the Ingroup. Click the Advanced Settings on Allowed Inbound and Blended set “YES” scroll down below then put check on the Ingroup then click Update.
4. Please advise your closer agent after they login on the campaign select the Ingroup so they can receive the Local Transfer Call.
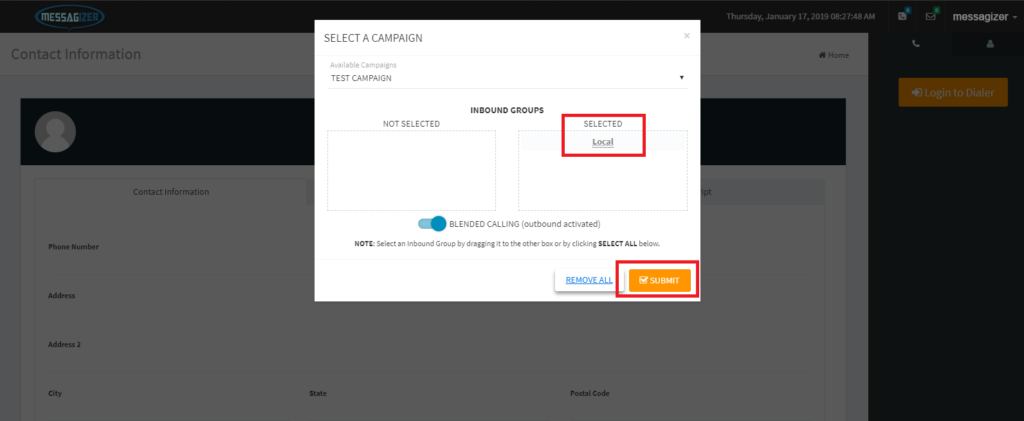
5. Once they selected the correct Ingroup they only need to select the Resume button so the other agent can now start Transferring the calls to them.