
Messagizer is a Voice, SMS & Fax broadcasting software solution for SMB’s and Service Providers. Messagizer has smart autodialer and smart predictive dialer capabilities. It enables service providers to offer broadcasting services to their users. It can be scaled to blast thousands of simultaneous calls using either VoIP or PSTN. Messagizer can handle most voice broadcasting scenarios. It is simple, reliable and easy to use and has user friendly web portal to manage.
Dashboard is a system monitoring page and It shows important live statistics of the overall system described below:
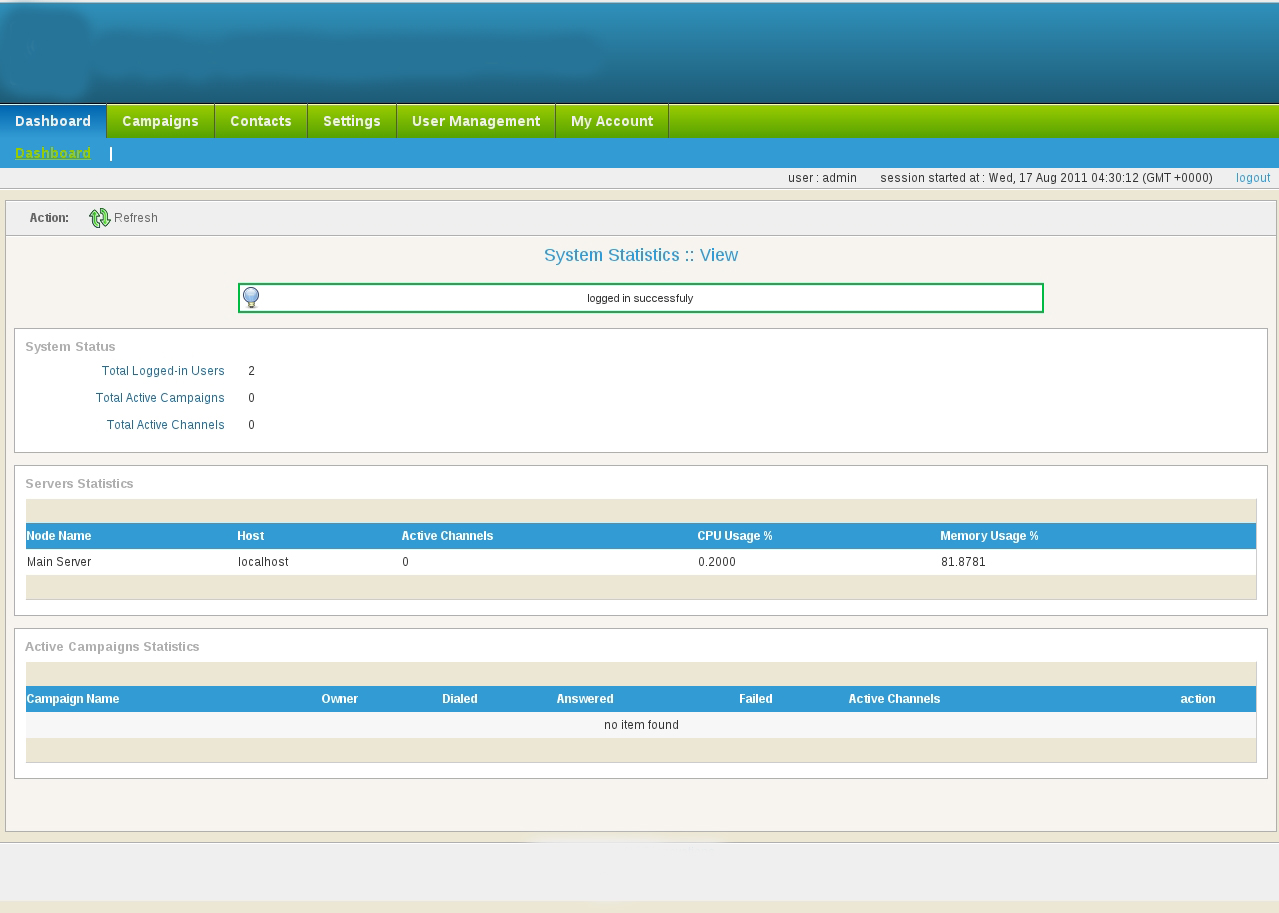
2.1. SYSTEM STATUS
System status shows the number of active campaigns and the total number of active channels
2.2. CAMPAIGN STATISTICS
Campaign Statistics shows real-time statistics of running campaigns with number of dialed, answers and failed calls
User can click on “Campaigns” tab on main menu bar to access this functionality. It has two menu items. That is Campaign Management and Campaign Summary. These two are described below.
3.1. CAMPAIGN MANAGEMENT
When User click on Campaign Management menu, it will open a page as shown below. Here user have various options for campaign management.
Add new: User can create a new campaign (see section 4.1.1. Add new campaign below)
Modify: Modify/Edit existing campaign parameters before it starts
Action: Start and Stop Campaigns manually
Monitor: Monitor Live calls of Campaign
Results: Call statistics of completed calls with data that called contact entered
Delete Selected button: Deletes selected campaigns

3.1.1. ADD NEW CAMPAIGN
User can access this option from:
- Click on “Campaign” tab.
- Click on “Campaign Management” tab.
- Click on “Add New”
- Select the type of campaign (e.g. Voice, Fax and SMS)
Messagizer provides all the campaigns into three main categories i.e. Voice, Fax and SMS. Voice Campaign is further categorized into Message, Agent, Interactive, Survey and Inbound campaign types.
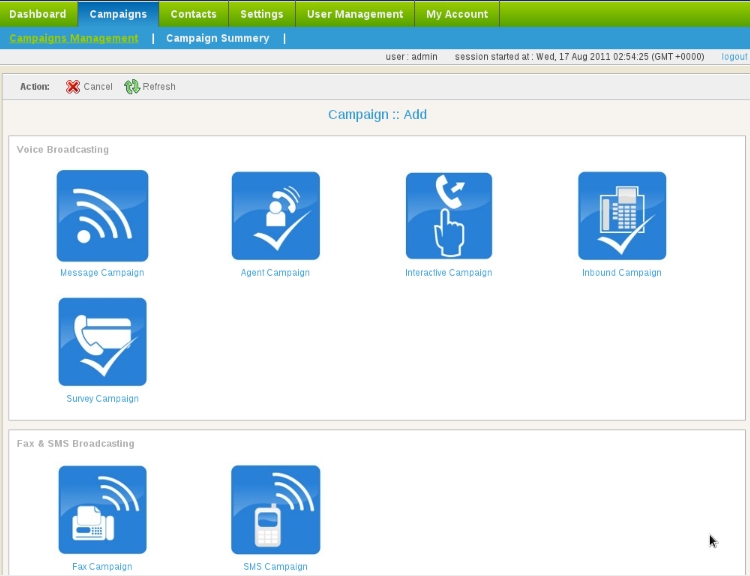
A detailed overview of each of the campaigns shown in figure above is given below. This detail will highlight the purpose of the campaign, how to create it, and its important fields that should be filled.
3.1.2. VOICE => MESSAGE CAMPAIGN
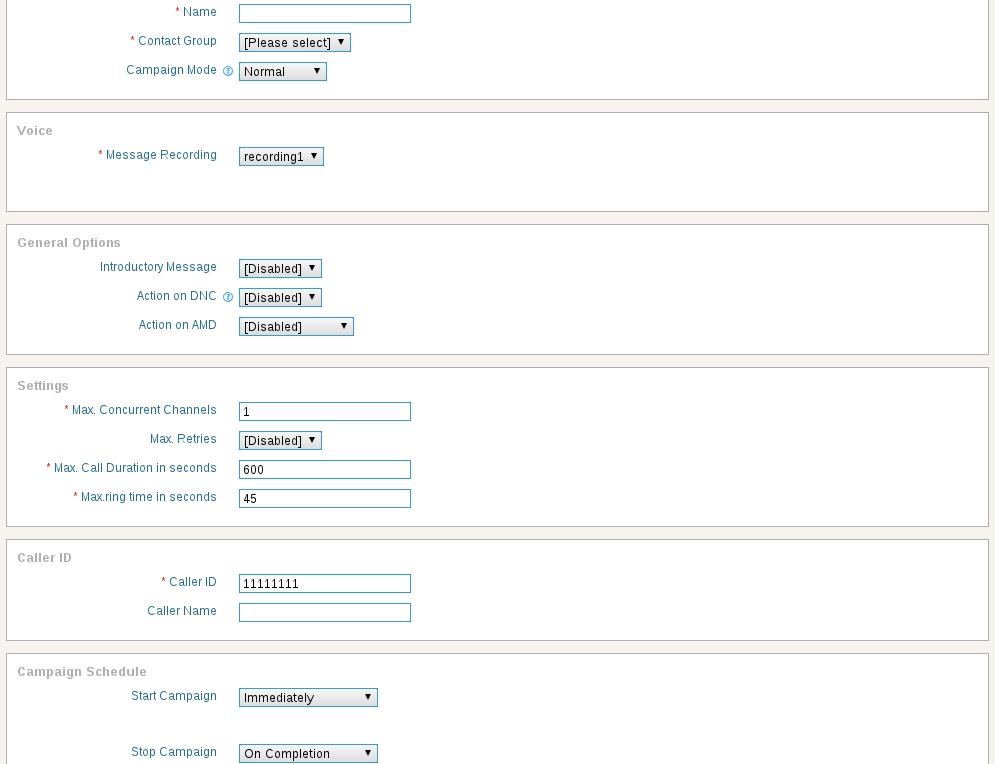
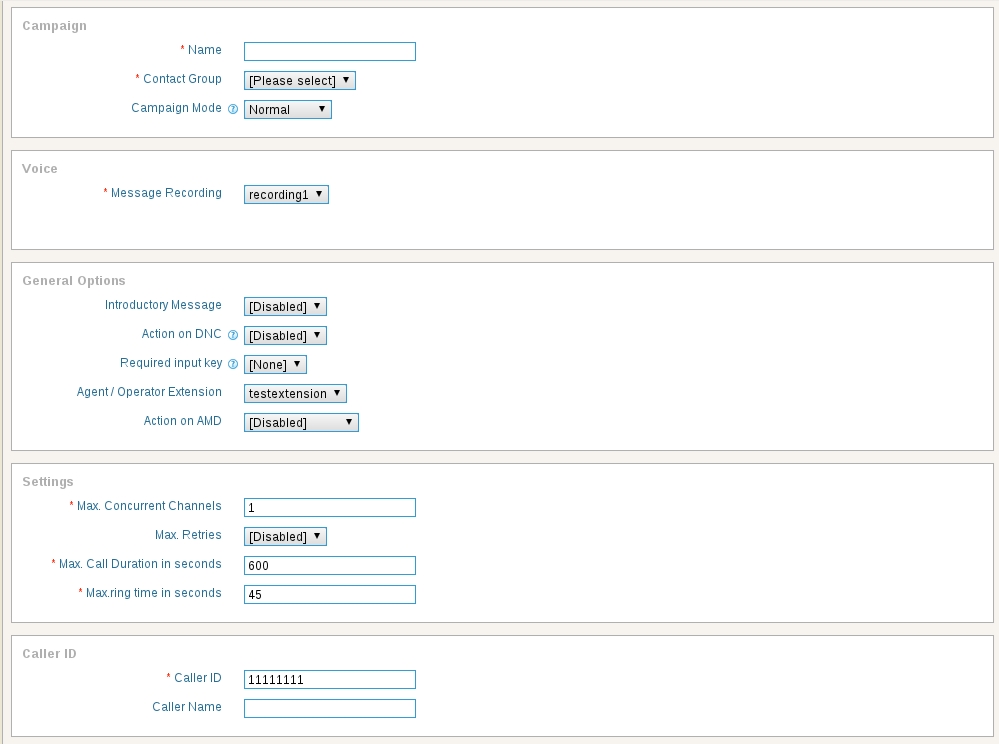
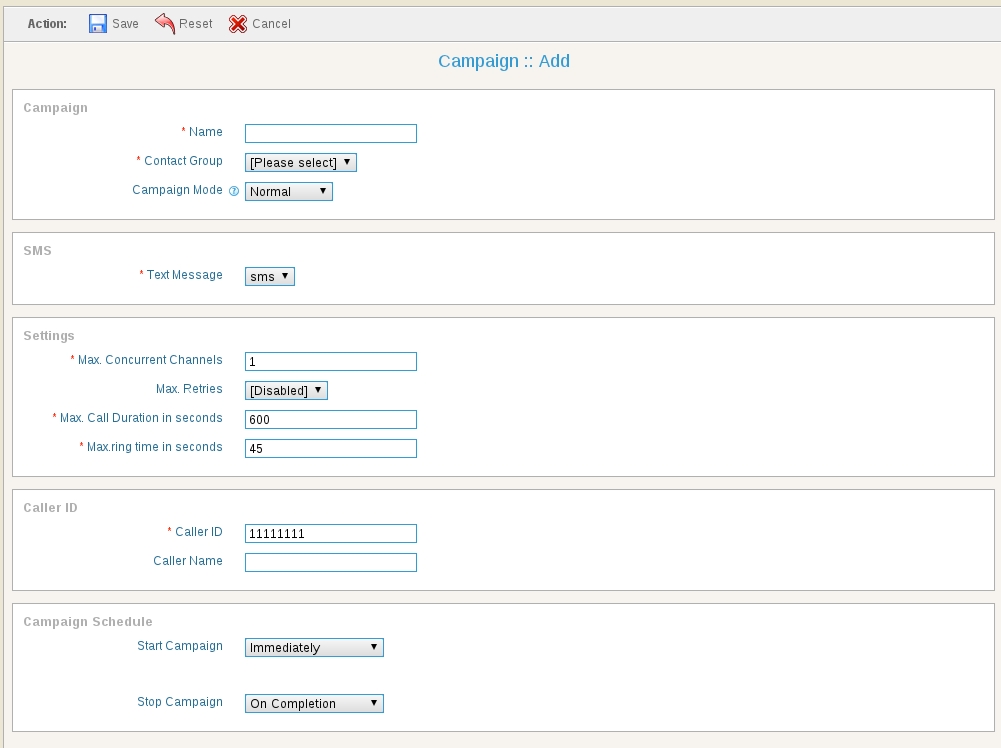
The purpose of this campaign is to broadcast a voice message. This type of campaigns dial numbers from contact list, on answer by the recipient, play recorded voice message and hangup. If user select “Message Campaign” from the figure above. This will open a form that lists all the options and settings for creating this campaign. The general parameters that user need to fill out for any type of campaign are:
Campaign Name: Name of the campaign for identification
Contact Group: Select contact group/List of phone numbers that this campaign will dial.
Campaign Mode: When selected to Normal, campaign stops after processing all the contacts. When selected to Permanent, it allows campaign to keep running even after processing all the contacts and waiting for new contact in background.
Voice Message: Select from list of already created / recorded messages.
Introductory Message: When enabled, this field allows the campaign manager to select an introductory message. This introductory message will be played immediately when the recipient receives call.
DNC Action: (Do Not Call) DNC could be enabled and disabled. When disabled, no action is taken. When enabled, it will set a key “9” for DNC action. This means that when recipient presses 9 on his phone, his number will be deleted from contact list.
AMD Action: (Answering Machine Detection) When it is disabled, it ignores Answering Machine. When hang up is selected, it detects AMD if found then hangup the call otherwise continue normally. Third option is to leave message, it detects AMD if found then play a different message and hangup. It has another field for Message recorded for answering machine
Settings
Max. Concurrent Channels: Maximum number of concurrent channels that said campaign will support
Max retries: Max number of retries to contact the said contact
Max call Duration: Maximum allowed duration for each call. after this duration call will be disconnected automatically , If user is not sure about duration of call let it be maximum number so that it does not effect call conversation.
Caller ID: Enter Caller ID to use with outgoing calls.
Caller Name: Enter caller name to use with outgoing calls
Campaign Schedule
Start campaign: Schedule campaign start it has following options
- a) Immediately: Start campaign immediately just after creation
- b) On Scheduled Time: Start campaign on selected data and time
Stop/Pause campaign: Schedule campaign stop time it has following options
- a) When Done: Stop campaign when everything is completed
- b) On Scheduled Time: Stop campaign on selected data and time
Click on “Save” button on top to save the campaign.
3.1.3. VOICE => AGENT CAMPAIGN
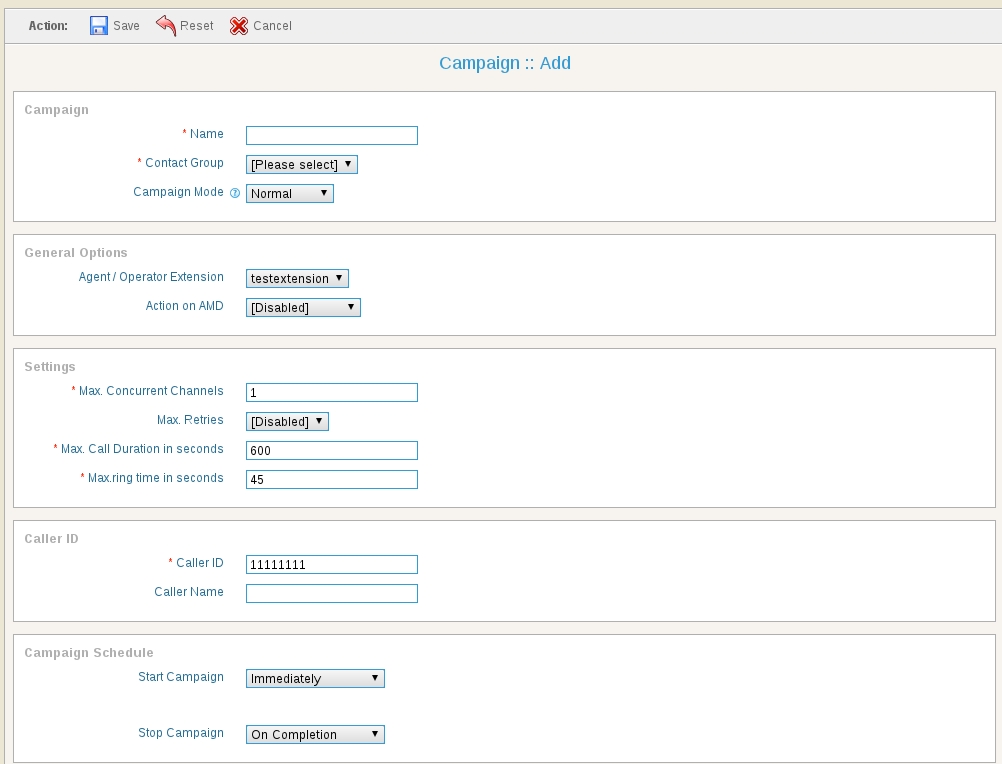
This type of campaign dial numbers from contact list and on answer by the recipient, directly forward call to agent/external call center/IVR system. When user selects this campaign, it will open a form that lists all the options and settings for creating this campaign.
Messagizer offers an updated version of Web phone for Agents. This WebRTC based phone allows agents to receive calls only using their browsers, without any additional hardware or software. In addition to receive forwarded calls it enable agents to do following actions.
- Load contact details in popup / CRM
- Load campaign script
- Call Transfer
- Set agent status Available / Unavailable
The general parameters that needs to fill out for this of campaign are:
Campaign Name: Name of the campaign for identification
Contact Group: Select contact group/List of phone numbers that this campaign will dial.
Campaign Mode: When selected to Normal, campaign stops after processing all the contacts. When selected to Permanent, it allows campaign to keep running even after processing all the contacts and waiting for new contact in background.
Voice Message: Select from list of already created / recorded messages.
Introductory Message: When enabled, this field allows the campaign manager to select an introductory message. This introductory message will be played immediately when the recipient receives call.
DNC Action: (Do Not Call) DNC could be enabled and disabled. When disabled, no action is taken. When enabled, it will set a key “9” for DNC action. This means that when recipient presses 9 on his phone, his number will be deleted from contact list.
Agent Extensions: This field shows extension on which calls will be placed. The extension may be forwarded to agents or external call center or any IVR system for further handling of call.
AMD Action: (Answering Machine Detection) When it is disabled, it ignores Answering Machine. When hang up is selected, it detects AMD if found then hangup the call otherwise continue normally. Third option is to leave message, it detects AMD if found then play a different message and hangup. It has a field for Message recorded for answering machine
Settings
Max. Concurrent Channels: Maximum number of concurrent channels that said campaign will support
Max retries: Max number of retries to contact the said contact
Max call Duration: Maximum allowed duration for each call. after this duration call will be disconnected automatically , If user is not sure about duration of call let it be maximum number so that it does not effect call conversation.
Caller ID: Enter Caller ID to use with outgoing calls.
Caller Name: Enter caller name to use with outgoing calls
Campaign Schedule
Start campaign: Schedule campaign start it has following options
- a) Immediately: Start campaign immediately just after creation
- b) On Scheduled Time: Start campaign on selected data and time
Stop/Pause campaign: Schedule campaign stop time it has following options
- a) When Done: Stop campaign when everything is completed
- b) On Scheduled Time: Stop campaign on selected data and time
Click on “Save” button on top to save the campaign.
3.1.4. VOICE => INTERACTIVE CAMPAIGN
This option enable user to create an interactive campaign. This type of campaign dials number from contact list, on answer by the recipient, play recorded message and if recipient presses desired key, it forwards recipient to a live agent for further call handling. When user selects this type of campaign, it will open a form that lists all the options and settings for creating this campaign.
Messagizer offers an updated version of Web phone for Agents. This WebRTC based phone allows agents to receive calls only using their browsers, without any additional hardware or software. In addition to receive forwarded calls it enable agents to do following actions.
- Load contact details in popup / CRM
- Load campaign script
- Call Transfer
- Set agent status Available / Unavailable
The general parameters that needs to fill out for this of campaign are:
Campaign Name: Name of the campaign for identification
Contact Group: Select contact group/List of phone numbers that this campaign will dial.
Campaign Mode: When selected to Normal, campaign stops after processing all the contacts. When selected to Permanent, it allows campaign to keep running even after processing all the contacts and waiting for new contact in background.
Voice Message: Select from list of already created / recorded messages.
Introductory Message: When enabled, this field allows the campaign manager to select an introductory message. This introductory message will be played immediately when the recipient receives call.
DNC Action: (Do Not Call) DNC could be enabled and disabled. When disabled, no action is taken. When enabled, it will set a key “9” for DNC action. This means that when recipient presses 9 on his phone, his number will be deleted from contact list.
Required Input Key: This defines on which key the system should transfer call to Agent/Extensions
Agent Extensions: This field shows extension on which calls will be placed. The extension may be forwarded to agents or external call center or any IVR system for further handling of call.
AMD Action: (Answering Machine Detection) When it is disabled, it ignores Answering Machine. When hang up is selected, it detects AMD if found then hangup the call otherwise continue normally. Third option is to leave message, it detects AMD if found then play a different message and hangup. It has another field for Message recorded for answering machine
Settings
Max. Concurrent Channels: Maximum number of concurrent channels that said campaign will support
Max retries: Max number of retries to contact the said contact
Max call Duration: Maximum allowed duration for each call. after this duration call will be disconnected automatically , If user is not sure about duration of call let it be maximum number so that it does not effect call conversation.
Caller ID: Enter Caller ID to use with outgoing calls.
Caller Name: Enter caller name to use with outgoing calls
Campaign Schedule
Start campaign: Schedule campaign start it has following options
- a) Immediately: Start campaign immediately just after creation
- b) On Scheduled Time: Start campaign on selected data and time
Stop/Pause campaign: Schedule campaign stop time it has following options
- a) When Done: Stop campaign when every thing is completed
- b) On Scheduled Time: Stop campaign on selected data and time
Click on “Save” button on top to save the campaign.
3.1.5. VOICE => INBOUND CAMPAIGN
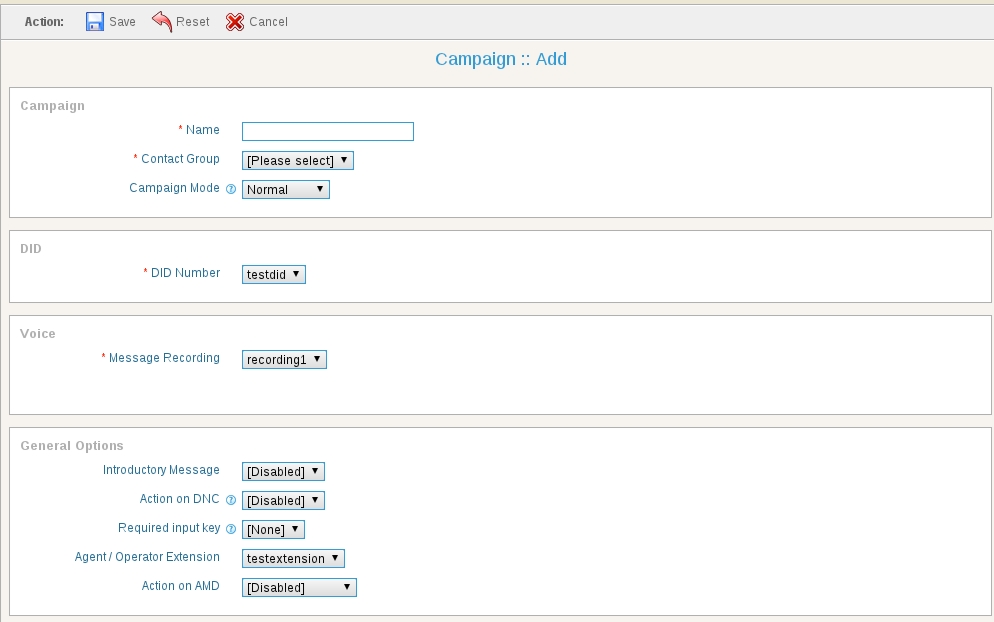
This option enables user to create an inbound campaign. This type of campaign works like IVR system. User publishes incoming numbers (DIDs) and interested callers call this/these number and listen a prerecorded voice message. If caller presses desired key, the call will be forwarded to live agents for further call handling. When user selects this campaign, it will open a form that lists all the options and settings for creating this campaign. The general parameters that need to fill out for this of campaign are:
Campaign Name: Name of the campaign for identification
Contact Group: Select contact group/List of phone numbers that this campaign will dial.
Campaign Mode: When selected to Normal, campaign stops after processing all the contacts. When selected to Permanent, it allows campaign to keep running even after processing all the contacts and waiting for new contact in background.
DID: Direct Invard Dialing. This field allows user to select DID number which will handle incoming calls from contacts.
Voice Message: Select from list of already created / recorded messages.
Introductory Message: When enabled, this field allows the campaign manager to select an introductory message. This introductory message will be played immediately when the recipient receives call.
DNC Action: (Do Not Call) DNC could be enabled and disabled. When disabled, no action is taken. When enabled, it will set a key “9” for DNC action. This means that when recipient presses 9 on his phone, his number will be deleted from contact list.
Required Input Key: This defines on which key the system should transfer call to Agent/Extensions
Agent Extensions: This field shows extension on which calls will be placed. The extension may be forwarded to agents or external call center or any IVR system for further handling of call.
AMD Action: (Answering Machine Detection) When it is disabled, it ignores Answering Machine. When hang up is selected, it detects AMD if found then hangup the call otherwise continue normally. Third option is to leave message, it detects AMD if found then play a different message and hangup. It has another field for Message recorded for answering machine.
Click on “Save” button on top to start the campaign.
3.1.6. VOICE => SURVEY CAMPAIGN
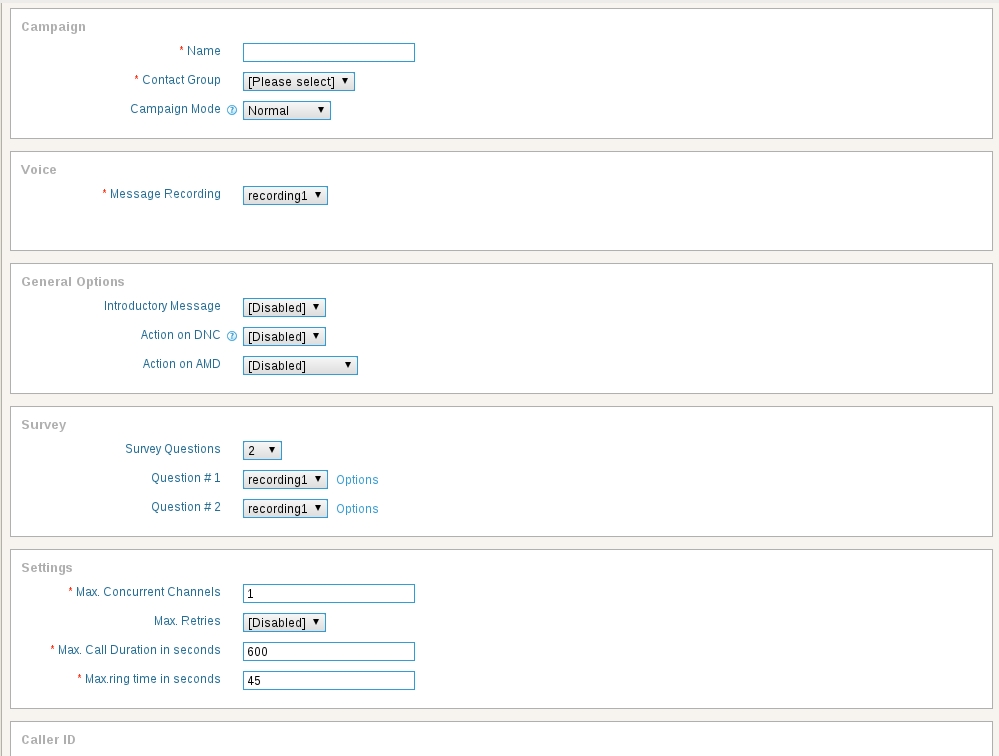
The purpose of this campaign is to make survey/polls. This type of campaign dials number from contact list, on answer by the recipient, ask set of questions and their responses from recipient and prepares report for further analysis. When user selects this campaign, it will open a form that lists all the options and settings for creating this campaign. The general parameters that needs to fill out for this of campaign are:
Campaign Name: Name of the campaign for identification
Contact Group: Select contact group/List of phone numbers that this campaign will dial.
Campaign Mode: When selected to Normal, campaign stops after processing all the contacts. When selected to Permanent, it allows campaign to keep running even after processing all the contacts and waiting for new contact in background.
Voice Message: Select from list of already created / recorded messages.
Introductory Message: When enabled, this field allows the campaign manager to select an introductory message. This introductory message will be played immediately when the recipient receives call.
DNC Action: (Do Not Call) DNC could be enabled and disabled. When disabled, no action is taken. When enabled, it will set a key “9” for DNC action. This means that when recipient presses 9 on his phone, his number will be deleted from contact list.
AMD Action: (Answering Machine Detection) When it is disabled, it ignores Answering Machine. When hang up is selected, it detects AMD if found then hangup the call otherwise continue normally. Third option is to leave message, it detects AMD if found then play a different message and hangup. It has another field for Message recorded for answering machine
Survey Questions: This field allows user to select number of questions in survey. At the moment, maximum of 10 questions are supported. Once user selected the number of questions, a question field is displayed that allows user to select recorded question and then configure desired responses.
Settings
Max. Concurrent Channels: Maximum number of concurrent channels that said campaign will support
Max retries: Max number of retries to contact the said contact
Max call Duration: Maximum allowed duration for each call. after this duration call will be disconnected automatically , If user is not sure about duration of call let it be maximum number so that it does not effect call conversation.
Caller ID: Enter Caller ID to use with outgoing calls.
Caller Name: Enter caller name to use with outgoing calls
Campaign Schedule
Start campaign: Schedule campaign start it has following options
- a) Immediately: Start campaign immediately just after creation
- b) On Scheduled Time: Start campaign on selected data and time
Stop/Pause campaign: Schedule campaign stop time it has following options
- a) When Done: Stop campaign when everything is completed
- b) On Scheduled Time: Stop campaign on selected data and time
Click on “Save” button on top to save the campaign.
3.1.7. FAX CAMPAIGN
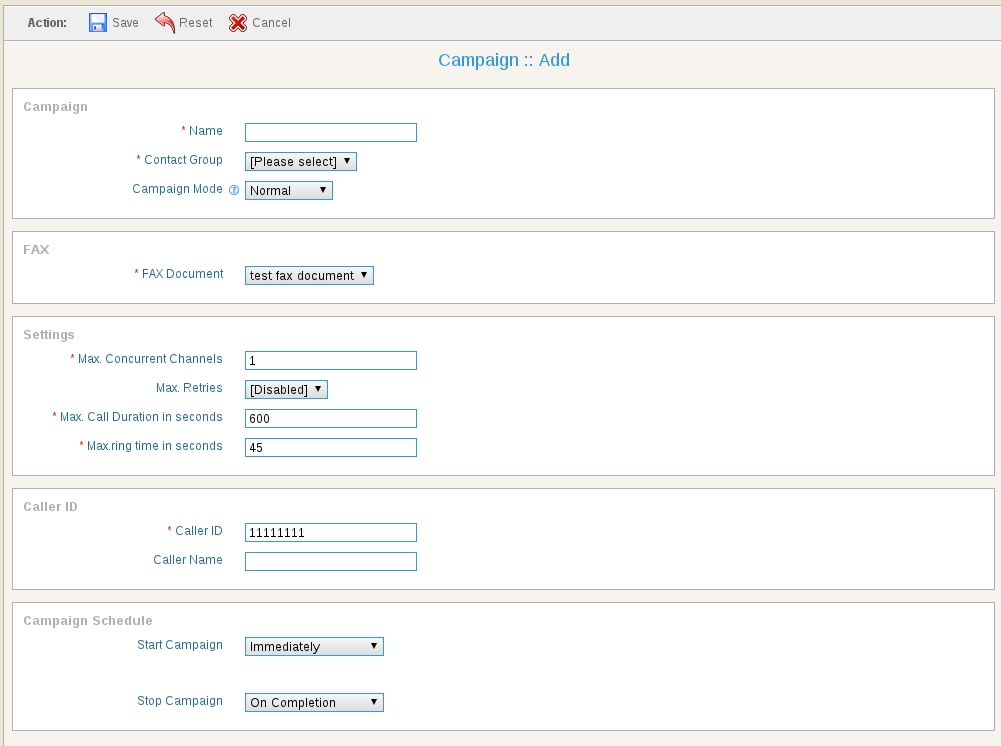
This option allows user to create Fax Campaign. This type of campaign dial numbers from contact lists and on answer by the recipient, transfers fax documents. When user selects this campaign, it will open a form that lists all the options and settings for creating this campaign. The general parameters that needs to fill out for this of campaign are:
Campaign Name: Name of the campaign for identification
Contact Group: Select contact group/List of phone numbers that this campaign will dial.
Campaign Mode: When selected to Normal, campaign stops after processing all the contacts. When selected to Permanent, it allows campaign to keep running even after processing all the contacts and waiting for new contact in background.
Fax Document: Select from list of already created / recorded messages.
Settings
Max. Concurrent Channels: Maximum number of concurrent channels that said campaign will support
Max retries: Max number of retries to contact the said contact
Max call Duration: Maximum allowed duration for each call. after this duration call will be disconnected automatically , If user is not sure about duration of call let it be maximum number so that it does not effect call conversation.
Caller ID: Enter Caller ID to use with outgoing calls.
Caller Name: Enter caller name to use with outgoing calls
Campaign Schedule
Start campaign: Schedule campaign start it has following options
- a) Immediately: Start campaign immediately just after creation
- b) On Scheduled Time: Start campaign on selected data and time
Stop/Pause campaign: Schedule campaign stop time it has following options
- a) When Done: Stop campaign when every thing is completed
- b) On Scheduled Time: Stop campaign on selected data and time
Click on “Save” button on top to save the campaign.
3.1.8. SMS CAMPAIGN
This option allows user to create SMS Campaign. This type of campaign dials numbers from contact list and send SMS messages to all recipients. When user selects this campaign, it will open a form that lists all the options and settings for creating this campaign. The general parameters that needs to fill out for this of campaign are:
Campaign Name: Name of the campaign for identification
Contact Group: Select contact group/List of phone numbers that this campaign will dial.
Campaign Mode: When selected to Normal, campaign stops after processing all the contacts. When selected to Permanent, it allows campaign to keep running even after processing all the contacts and waiting for new contact in background.
Fax Document: Select from list of already created / recorded messages.
Settings
Max. Concurrent Channels: Maximum number of concurrent channels that said campaign will support
Max retries: Max number of retries to contact the said contact
Max call Duration: Maximum allowed duration for each call. after this duration call will be disconnected automatically , If user is not sure about duration of call let it be maximum number so that it does not effect call conversation.
Caller ID: Enter Caller ID to use with outgoing calls.
Caller Name: Enter caller name to use with outgoing calls
Campaign Schedule
Start campaign: Schedule campaign start it has following options
- a) Immediately: Start campaign immediately just after creation
- b) On Scheduled Time: Start campaign on selected data and time
Stop/Pause campaign: Schedule campaign stop time it has following options
- a) When Done: Stop campaign when every thing is completed
- b) On Scheduled Time: Stop campaign on selected data and time
Click on “Save” button on top to save the campaign.
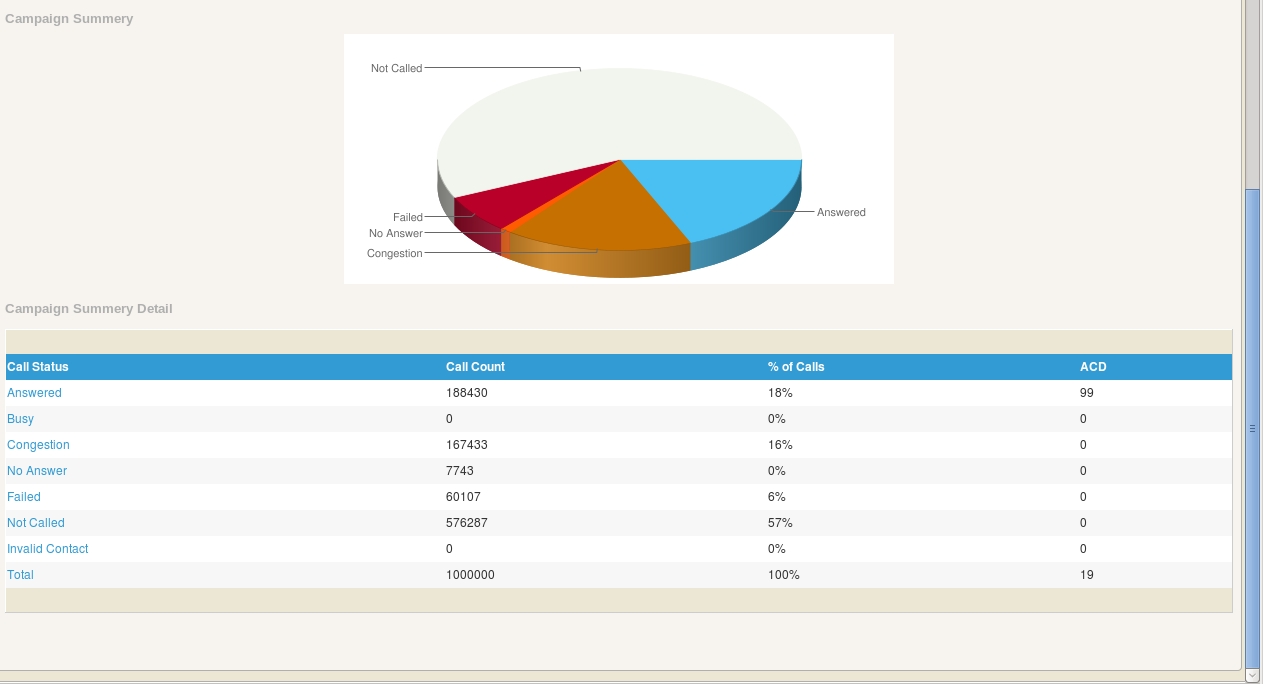
3.2. CAMPAIGN SUMMARY
Campaign Summary option provides user a chart view of campaign status. It shows the Answered calls, Not Answered calls, Failed, Not Called, congestion etc.
Messagizer allows user to manage contacts. Contacts can be grouped together into a cantact group. Contacts are basically telephone numbers to be dialed. A contact group can have telephone numbers of multiple destionations/countries. User can also manage regions, countries, and destinations for call termination to a particular group or contact.

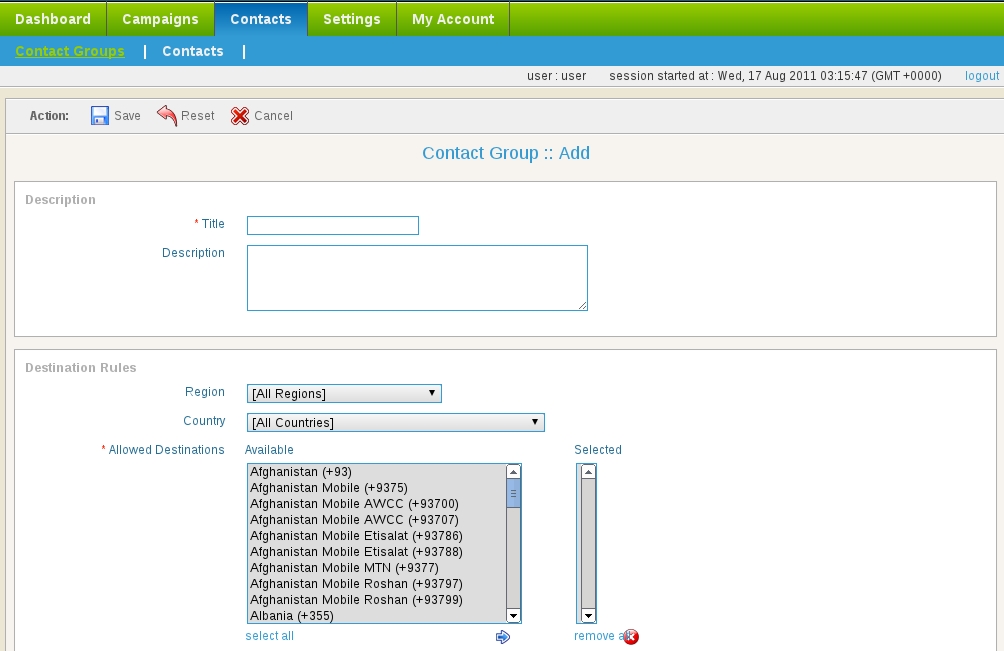
4.1. CONTACT GROUPS
Following figure shows required fields for creating a contact group into the system.
Title: Title allows user to distinguish between different contact groups.
Description: Description allows to further elaborate contact group if title is not enough meaning.
Regions: Regions lists all the continents and major regions within those continents.
Country: user can select countries where he/she lives in.
Allowed Destinations: This field shows user the allowed destinations from selected regions and country within that region. However, user can see all the allowed destinations if he/she select all regions and all countries option. user can select or remove any number of desired destinations for particular contact group. So that contact group will have only contacts to and from selected destinations.
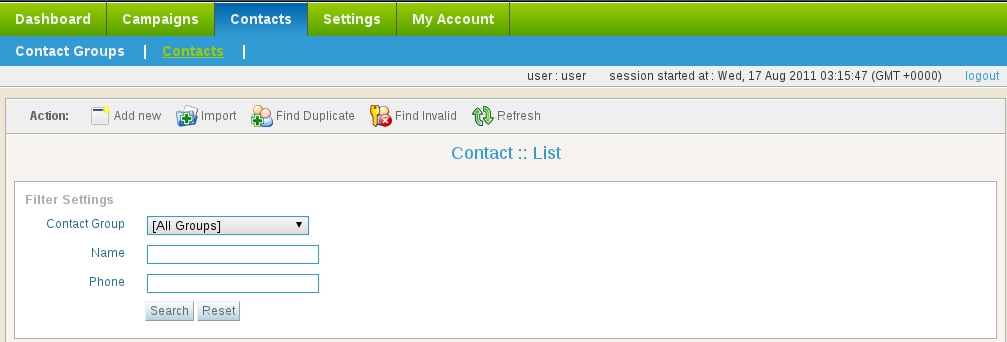
4.2. CONTACTS
A contact is a phone number other personal information.
Add new: Allows user to enter a contact in a particular contact group by clicking on add new button.
Import: This option enables user to import contact list from external text or CSV file by clicking on “import” button. The format of external file needs to be in CSV (comma separated values) format as show below:
923330000000, First Name, Last name, email@domain.com, address, custome value 1, custome value 2, custome value 3, comments
923331111111, First Name, Last Name, other@domain.com, address, custome value 1, custome value 2, custome value 3, comments
First field is phone number that is mandatory while other fields are optional. Which means user can create a contact list simply using following format:
923300000000
923331111111
…
Find Duplicate: This option enable userto find duplicate contacts.
Find Invalid: This option enable user to find invalid contacts form list. Invalid contacts will be defined as contacts that does not match with pre-selected destinations of contact group.
4.3. DNC CONTACTS
DNC Contacts are the contacts that user do not want to call. User can apply this DNC list on original contact list and it will filter out and eliminate those contacts from contact list which are present in the DNC list.
This is very important area of Messagizer. It allows user to manage Extensions, Trunks, DIDs, Recordings, SMS and Faxes. All these options are required when user need to create a campaign. In other words, whenever user want to create a campaign of his/her choice, user first need to come to settings to upload some recordings, SMS or faxes, user may need to add trunks for call termination, user may need DIDs if he/she want to create inbound campaign etc.
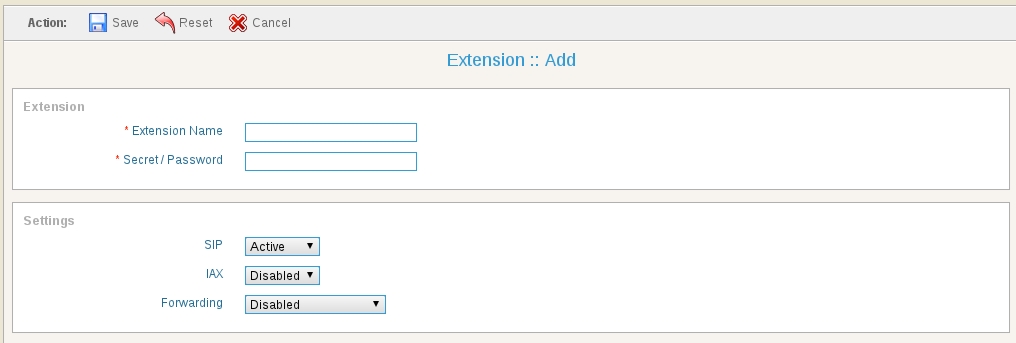
5.1. AGENT/EXTENSIONS
Agent/Extensions form allows user to enter extension name, password, SIP or IAX protocol, and forwarding. This setting is required for Agent Campaigns or Interactive Campaigns. User can forward any extension to external call center or IVR System.
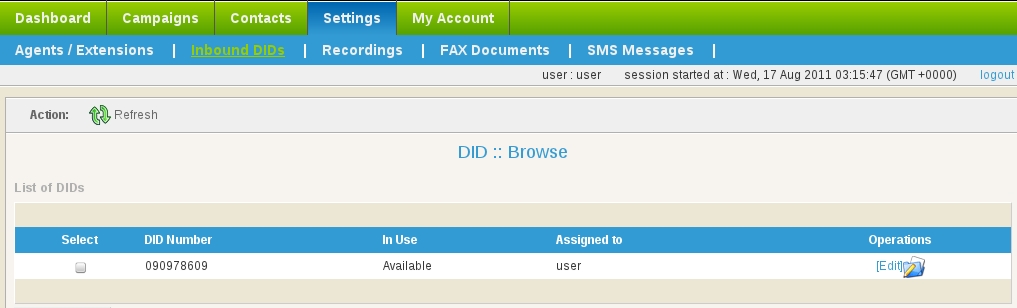
5.2. INBOUND DIDS
DID number is the number that caller will dial and the system will receive that call. Following form allows user to enter DID number, its description, and the trunk name that will receive the inbound call for that DID.
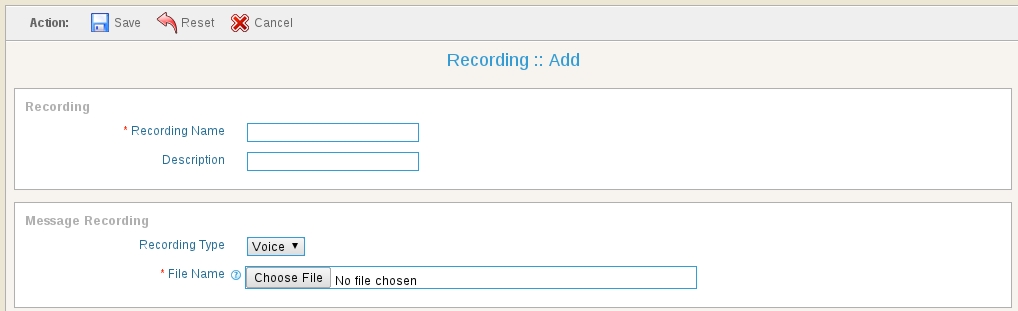
5.3. RECORDINGS
This is an area where user will upload recordings. These recordings could be messages, survey questions, introductory message etc. If user don’t have recordings. Don’t worry, system also provides user with TTS (text-to-speech) feature. Select recording type to Text and write text that user want to play. System will create its recording and that message will be played. System also provides user with a feature to play the sound that user uploaded or written text.
5.3.1. PREPARING VOICE RECORDINGS
The required format of sound file need to 8 Khz sampling rate , 16 bit mono and supported types is wav file. User can use one of following methods to create 8 khz 16 bit mono wav files
- Microsoft Windows built-in recording tool “Sound Recorder”
- Click on “start” button on windows operating system.
- Click on “All Programs”
- Click on “Accessories”
- Click on “Entertainment”
- Click on “Sound Recorder”
- Record your voice through mic using start and stop buttons
- Click on File menu
- Click on “Save as”
- Enter proper file name
- Select “Save as type” as wav file
- Click on “Change” button to change format to 8khz 16 bit mono
- Upload saved file to Messagizer as new recording
- TTS (Text-to-speech) programs
Open source solution like espeak, flite and festival and commercial solutions like cepstral, ispeech and voiceforge. This feature has been added to new version of Messagizer using festival TTS program. Now user just writes text, its audio will be created by system.
- Open source software audacity for audio recording and editing
d. Professional voice overs from professionals from providers like voice123

5.4. FAX DOCUMENTS
This is an area where user will manage fax documents. User can also preview fax documents once they are uploaded.

5.5. SMS MESSAGES
This is an area where user manages SMS messages. Following form is simple and just requires Text Title for message, description if any, and SMS message that user want to broadcast.

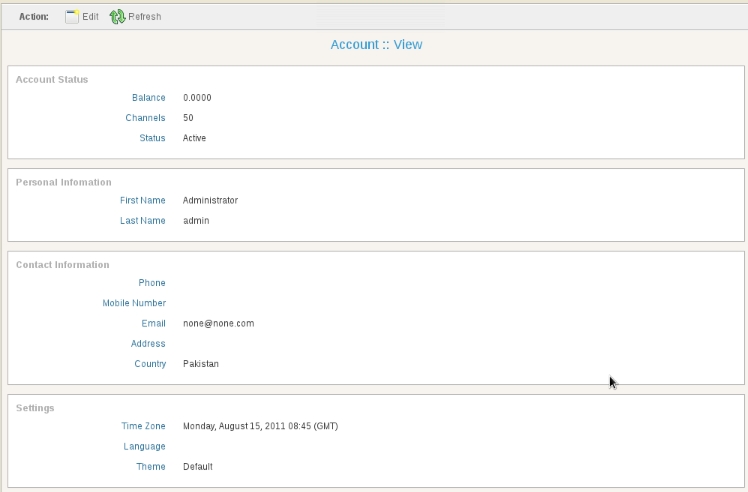
6.1. MY ACCOUNT
This form provides account status, personal information, contact information, and time zone settings.
6.2. CHANGE PASSWORD
User can change password in My Accounts -> Change Password form as shown below.
